Wednesday, November 23, 2016

Lab: Separating Materials

For the summative task of our recent Unit of Inquiry (“Matter and Materials”) I wanted to get students engaged in a fun hands-on experiment.
One of my colleagues suggested I do the “Cream to Butter” experiment (OK, I made up the name…). After researching the experiment and seeing the wonderful possibilities, I decided to take it on. I quickly created two documents- an experiment documentation sheet and another document with more general questions about separating materials.
Below is the process of our lab in the form of a lesson plan. I hope you find it interesting and use it in your own classroom:

Materials (per group):

  • A box of whipping cream (some room temperature and others fresh out of the fridge)
  • An empty bottle
  • A measuring cup
  • A timer
  • A pair of scissors
  • Scales
  • A thermometer
  • The lab sheets (the one with general questions I used is definitely optional)

Tuning-In:

  1. Ask the students what they know about separating materials (methods, tools, results, etc.)
  2. Show them the box of whipping cream. Ask them if they know what it is, what people do with it, and what the ingredients are. Then, ask them if they think they can separate what’s inside the cream.
  3. Brainstorm ideas as to how they could separate it.
  4. Tell students that today they will try to separate the whipping cream by shaking it (it is called “churning”, which is the process of shaking up cream or while milk to get butter).

The Experiment: 

  1. Preparation:
    1. Divide the students into groups of 4-5 students.
    2. Each group should get the materials listed above.
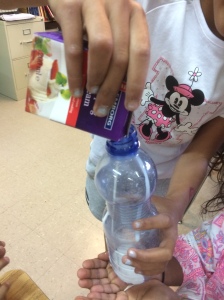
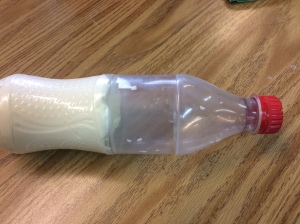
    3. Have the students cut the cream box, pour it into the empty bottle, and wait.
    4. Once all groups finished, make sure the bottle caps are screwed on tightly.
           2016-11-14-14-33-18            2016-11-14-14-34-35

  1. Documentation:
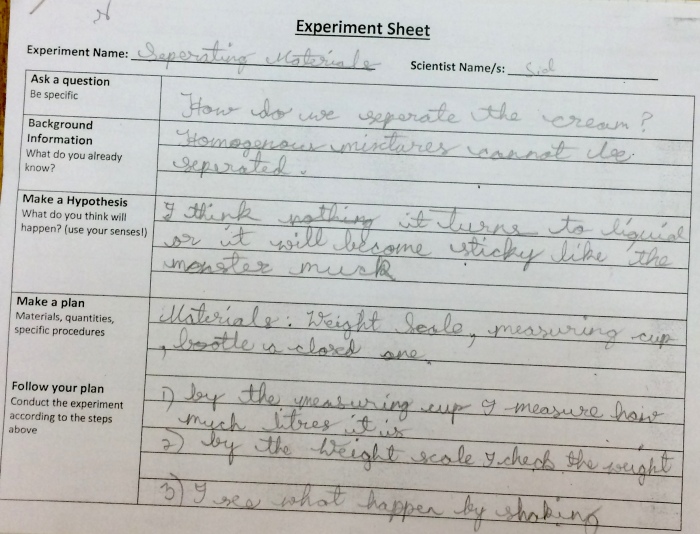
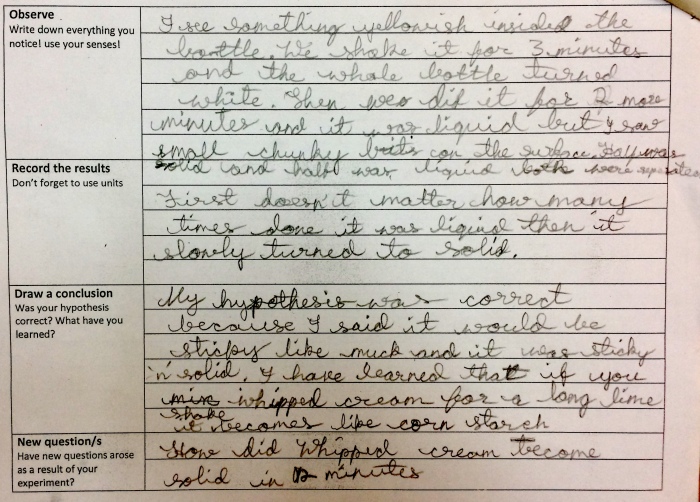
    • Go over the experiment sheet and make sure all students know what to write in each step.
    • Give students time to fill out the first part of the sheet:
      • The question (“what happens if I shake a bottle full of whipping cream?” and “is it possible to separate whipping cream by shaking it?” are two good examples for student questions.
      • The Background Information (they should write what they know about whipping cream and about separating materials by shaking them)
*** Their Hypothesis (“It will separate”) should not suffice. Make sure they are specific in their explanation, and that they don’t use words such as “it” to describe the bottle or the cream.
  • Once all students are done, go on to the next step.
2016-11-23-16-08-48
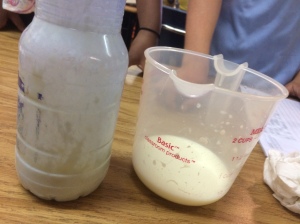
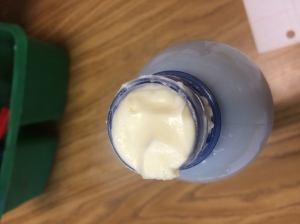
  1. The Experiment: (Basically, students will be shaking the bottle continuously until it completely separates. It will separate into a solid (butter) and a liquid (buttermilk), but don’t tell them yet…)
    • Students will take turns shaking the bottle. Every one minute, they will change “shaker”.
2016-11-14-14-37-48               2016-11-14-14-37-26
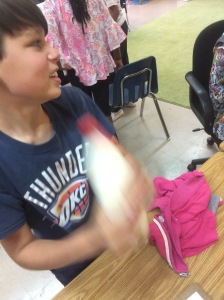
  • After every 3 minutes (we went up to 18 minutes for the room temperature cream groups), they will stop the shaking and record their observations in their sheets. Remind them to use their senses and be as accurate as they can in their observations and records.
  • When they are done recording, they should continue the timer and the shaking.
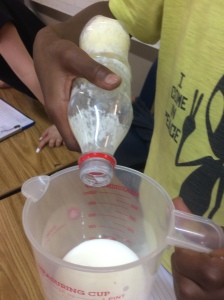
  • After about 9 minutes, the cold whipping cream groups should have a solid (the butter) and a liquid (the buttermilk) clearly separated in their bottle. That’s pretty much the end of their experiment. They should now pour the liquid into the measuring cup, and complete the Observation section as well as the “Record the Results” section. They should spend ample time and effort on this part, continuing to observe and think of ways to describe their final product. Remind them that they might want to use the scale and the thermometer you gave them. How? They should think carefully.
2016-11-14-14-47-23
2016-11-14-14-52-12            2016-11-14-14-52-35    2016-11-14-15-08-04
  • The room temperature group will continue to shake their bottles and record their observations every 3 minutes. You should stop them at about 15 or 18 minutes because it might just not separate…
2016-11-14-14-47-01
At this point we ended the work for the day and stretched a bit. Rigorous shaking can be hard on 10 year olds…

  1. Discussion:
    • Once they are all done filling out the entire sheet, discuss with the students what they did, what they noticed, and ask them why the cream of some groups did not separate (because of its temperature).
    • Ask students if they think this separation was a physical or a chemical reaction and why (it was a physical reaction, because indeed, the process can be reversed!)
    • Have students share the last question “New Question/s” as ideas for a follow-up experiment.
2016-11-23-16-09-06
*** Extension: If the question did not come up, ask them if they think the room temperature cream could still be separated if it is now placed in the fridge (it won’t, according to our experiment…). Placing some in the fridge and others leaving out could be another experiment, introducing concepts such as independent and controlled variables.

Celebration:

  • Another exciting part of this experiment is the fact that the product of their separation is completely edible!
  • Bring some bread and jam, and have some fun!

Learn more about the experiment:

Friday, May 6, 2016

Guide: Become a Google Certified Educator

7350335
As educators, no matter if we are teachers, teaching assistants, coaches, or administrators, we use technology every day. We send and receive eMail messages; share assignments with students or communicate with parents; schedule appointments; create presentations; create, analyze and share data; and so on. Google for Education is a leader in the field, and the Google for Education suite includes all of these tools for us to utilize.
In this blog entry, I share information about, and resources for two of the four certification processes Google offers to educators:
  • Google Certified Educator- Level 1
  • Google Certified Educator- Level 2
  • Google Certified Trainer
  • Google Certified Innovator
The Google Certified Educator levels 1 and 2 are quite similar (the difference is the number of Google tools and the depth of questions and assignments). The Google Certified Trainer and Innovator are quite different, and so I will leave it for a different time (although I will share some resources at the bottom of this entry.

The Exams

Once registered for the Google Certified Exam (“GCE”) (currently it costs $10 for level 1 and $25 for level 2), test-takers  receive a personal and temporary GAFE account, and are instructed to log in using an incognito window. Once logged in, test-takers are asked to sign some privacy and other agreements, are asked to take a snapshot of themselves (the webcam must stay on for the duration of the exam), and the 3-hour test begins.
Both tests are composed of two-parts. The first includes about 20 multiple choice questions about being an educator in the technological age, as well as questions about the use of Google products (Docs, Sheets, etc.). The second part include a number of authentic scenarios in the lives of teachers in which you must decide which Google tool/s to use and why, and more hands-on “assignments,” such as to create and send assignments to students using Google Classroom, organizing spreadsheets, scheduling appointments in Calendar, and so on. You have a maximum of 3 hours to complete the exam, and are not allowed to stop or pause once the exam started.

Preparing for the Exam

There are several different ways you could prepare for the exam. From experience, I would recommend that in addition to using Google products on a daily basis, you do take the time to at least go through the tutorials. The reason is that Google continuously add new tools and features, which are not always easy to figure out. Getting exposure to them prior to the exam would increase your chances of passing!
The first place to go to is Google’s Training Center, where you will find general information about the certifications Google offers. Once you understand and decide what you’re going for, it wouldn’t hurt to explore the Resources tab where you can find useful and interesting information about different tools, what innovative educators are doing with Google tools, or a place to join one of the many community of Google educators.
The next thing to do is to click on the Training tab, which will take you to the place where you choose which certification to begin training for. you can choose from the Fundamentals (GCE level 1), Advanced (GFE level 2), Devices training (for Chromebooks and Android tablets), or the Trainer training (to become a Google Certified Trainer).
If you are ready to begin studying for the Level 1 (or level 2) exam, click on the Fundamentals Training box to log in and begin the training. Alternatively, you can choose to click hereto get more information about the exam, begin training, or register for the exam. All in all, for the level 1 exam, you have 13 units, and for the level 2 exam you need to go through 9 units. At the end of each unit you get a short multiple choice (or fill-in the blanks) assessment to test your skills.
Google’s Training Center is not the only place to get training for these exams, but definitely the place to start!
One last thing. Before you begin, make sure:
  • You have prepared for the exam using one of the GCE preparation tools (if you fail, you can take it again after a month, then after a year);
  • You have a working webcam (don’t have someone else take the exam for you…); and,
  • Your internet connection is adequate (I am teaching in Ethiopia where the connection is quite slow. When my connection timed-out, I was still able to refresh the page and get back to the exam with little time lost)

That’s it. See the resources I complied below to get more information about the certifications and more!
I hope this is helpful.
GOOD LUCK!

Certification-related resources:

  • Google has recently acquired Synergyse– a training service. Now you can get a free and innovative, interactive Chrome extension that trains you in Google Apps products.
  • Eric Curtis is an experienced technologist, blogger and trainer. His blog post about the two certifications can give you more information.
  • Kasey Bell‘s ShakeUpLearning blog offers several guides, tools and “cheatsheets” that will help you to get certified. All you have to do is sign up to receive these freebies instantly (by signing up you will receive occasional harmless eMails about technology and education). This is an “all-about-the-certificates” Google Slides presentation she used at the Texas Google Summit.
  • Information about becoming a Google Certified Trainerand Google Certified Innovator.

Other related resources: