Monday, September 25, 2017

Google Forms: Creating a Scavenger Hunt

Google Forms Scavenger Hunt

Over the summer, my son and I tried to find some interesting things to do around the city. After a short research, I found a company offering some exciting scavenger hunts around the country. There was a phone number to call and schedule the hunt, which I excitedly started dialing. The “tour operator” said that the tour is usually for groups of 8-14 members, and it costs the equivalent of $400. Shocked, I thanked the lady and hung up the phone.
When I told my son about the call, he was quite disappointed. After all, this was the only exciting-sounding activity I suggested to him. With a Maker attitude, I asked him if he would like to create our own scavenger hunt. “Let’s go to the Mall, find interesting shops, snap some shots, and create a scavenger hunt for your little cousins”. I was delighted to see his face glowing again, and within five minutes we were ready to go! Mobile phone and a clipboard in hand, we drove to the mall.
Why are these scavenger hunts so expensive? Aside for the fact that they were created by for-profits, I am not sure. I don’t really care, either, because I found an exciting and satisfying way to create my own, using Google Forms!

How to Create a Scavenger Hunt Using Google Forms?

When creating scavenger hunts in Google Forms, you need to be familiar with a couple of features:
  • Media Use: You will need to insert a variety of media (images, videos, etc.) which would serve as the hunting grounds (where the clues are hidden)
  • Sections: All questions are entered within the Form’s Sections. All questions entered in one section are viewable at once, which questions entered in the following sections are locked until the hunter correctly answers all questions in the previous section.
  • Response Validation: This option (the 3 vertical dots at the bottom of questions) allows you to set one correct answer, which, until it is entered in the correct spelling/ format, the answer is marked as “incorrect” hence hunters will be unable to move on to the next section until all questions are answered correctly. You can use answers in the format of numbers, dates, letters, etc.

Once you familiarize yourself with the above elements, you are ready to start creating your scavenger hunt.

Example Scavenger Hunt: Around the World

I created an example for a scavenger hunt (you can copy it here) which you can follow step-by-step to understand how to create your own. Before we start, make sure every question is marked as “Required”, so that hunters cannot just move on to the next section without first entering a correct answer.
  1. Create a title and a description. An image is optional.
  2. If you would like to separate this part from the first round of questions, create a question (such as, “Are you ready to start?”), which will take the hunter to the next section.
  3. If you chose to separate the introduction from the first batch of questions, create a new section and name it (I named it “The Hunt: Africa”).
  4. Go back to your section one question and click “Go to section based on answer”, to ensure the hunters are directed to the next section (the first question section)
Screen Shot 2017-09-25 at 8.07.16 PM

6. In the new section’s description, explain what the hunter will be looking for in this section.
Screen Shot 2017-09-25 at 9.08.57 PM.png
7. Enter a question. The answer to my question is “Ethiopia”, so in the Response Validation (make sure the question type is “Short Answer”), I entered Text, Contains, and the answer. As the validation clue (what will appear until the hunter entered the correct answer), I entered an encouraging clue.
Screen Shot 2017-09-25 at 8.18.11 PM
8. I created another question. This time, the hunter will need to watch a video in order to find the correct answer. I made sure to add a description that would guide hunters to use the correct format (not to write “Hospital” with a capital H, because Response Validation is case sensitive, so it will mark it wrong…)
Screen Shot 2017-09-25 at 8.28.55 PM
9. Once the hunter has answered both questions correctly, s/he will be able to move on to the next section. The next section is called “The Hunt: Asia”
Screen Shot 2017-09-25 at 8.32.09 PM
10. For this question I decided to add a date as the answer, so I made sure to write the correct format in the question’s Description.
Screen Shot 2017-09-25 at 8.51.55 PM
11. Finally, when the scavenger hunt’s questions have all been answered correctly, I created a final section that tells the hunters what they won. Once they are done, they can submit the Hunt and receive their reward.
Screen Shot 2017-09-25 at 8.51.33 PM

Book Project Scavenger Hunt

Another examples I created was a digitized version of my colleague Jill Fenn’s book project example. She created a traditional scavenger hunt for the excellent book Freak the Mighty by Rodman Philbrick. For this hunt (click to make a copy), students were to follow the clues from the book to different locations around the school. All I did was to go to these locations, and find permanent markers (the hunt’s longevity is important) to be used as unlocking clues.
Screen Shot 2017-10-05 at 3.51.55 PM     Screen Shot 2017-10-05 at 3.52.50 PM
If you would like to try the hunt, here are the answers to the questions (1. ICS; 2. twelve; 3. MS FIC PHI; 4. COMPANY; 5. 21; 6. HEALTH OFFICE; 7. eleven; 8. M-105). You can easily adjust the hunt to locations around your school.
And that’s it!
I hope this was an easy enough of a tutorial. If you have any questions, please let me know. And if you created a scavenger hunt of your own, please share the URL in the comments, or on Twitter!
Enjoy!!!

Friday, September 15, 2017

5 Awesome Google Forms Add-Ons

Blog- Forms Extensions.jpg
Google Forms is a powerful tool on its own, but you can super-charge it with add-ons. Add-ons are third-party tools that allow users to modify or enhance existing Google Forms (and Sheets) functionalities. Each add-on, which you get from the Chrome Web Store, usually “specializes” in one area, allowing you to tailor your Form or your Sheet to your own needs.

Let’s have a look at 5 of my favorite Google Forms add-ons:

Form Notifications:Screen Shot 2017-09-13 at 10.07.01 PM

Form Notifications allows you to send email notifications automatically, once the form has been submitted. Emails can be sent to the form creator, the respondent, or to both.
Uses:
  • Send a thank you e-mail with additional information to students’ parents who signed up for a particular meeting time with you.
  • Receive an e-mail after 5 parents filled out the form (the default is after 10 responses).

FormLimiterScreen Shot 2017-09-13 at 10.06.21 PM

FormLimiter is a great add-on to use when you would like to stop accepting responses automatically, at a certain point. For example, you can set a limit to the number of responses, at a certain date/time, or when a spreadsheet cell equals a certain value.
Uses:
  • Number- A registration form with limited number of available spaces.
  • Date/Time- Setting a deadline for a Google Form assignment.
  • Cell=value- Looking for volunteers’ help. Once a respondent selects “Yes”, the form shuts off.

Form Publisher (and their video): Screen Shot 2017-09-13 at 10.07.37 PM

This is a fantastic add-on that takes your Form submissions and displays them in a variety of formats (Google Docs, Sheets, Slides or as a PDF document). Although this requires a bit of preparation ahead of time, once you customized the destination document’s look, the rest is done automatically. Basically, each Form question has markers (that looks something like this: << the question >>). You then move those around in the document based on your needs, and then, once responses are submitted, each response is automatically pasted between the <<  >> symbols.
Here is an example of a Form I created for my students’ end-of-unit self-reflection. Using the Form Publisher add-on, I customized the destination file (I chose Google Doc). Then, once students submitted their Form (reflection), it used the template to create individual documents, that include their unique responses. All files were automatically organized inside a neat folder. Incredible, ah?
Uses:
  • Reflections
  • Assessments
  • Invoice receipts

FormRecycler (and their tutorial): Screen Shot 2017-09-13 at 10.09.17 PM

Have you ever needed to copy questions from one Form to another? And was unsuccessful? Well, FormRecycler allows you to do just that!
All you have to do is get into the Form you are working on, activate the FormRecycler add-on, choose the Form you’d like to “import” questions from, and you’re done!
Uses:
  • Combining assessment questions from several different Forms
  • Updating last year’s parent questionnaire

Choice Eliminator 2:Screen Shot 2017-09-13 at 10.15.12 PM

This fantastic add-on eliminates (deletes) options (“answers”) from your questions after they have been selected by a previous respondent. It works with multiple-choice, dropdown, or checkbox questions.
Uses:
  • Selecting time slots for parent conferences
  • Creating an inventory of class items
  • Students choosing groups/ jobs/ topics


And… a bonus (paid) add-on for all your mathematical needs:


EquatIO (30 days free trial) Screen Shot 2017-09-13 at 10.12.01 PM

Ever tried to use Forms for Math assessment? What would the fraction “thirteenth” look like? How about a square root? Yes, a disaster! With EquatIO, you can create complicated mathematical equations and formulas by typing or handwriting them on the screen. It’s that simple!


I hope these add-ons help you become more creative and productive!
If you liked what you saw, gimme a holler either here or on Twitter!

Sunday, September 10, 2017

Great Ways to Use Google Forms in the Classroom

Ronen- Google Forms
If you haven’t been using Google Forms in your classroom on a regular basis, you don’t know what you’re missing! Google Forms started as a simple form-creating application, and since its inception in 2007, a lot has happened, especially for us educators.

Google What?

Google Forms allows educators to create questions, and assign a variety of response types for users to fill in: short/long answers, checkboxes (for multiple “correct” responses), multiple answers (with only one “correct” answer), rating, or a grid (for several questions that share the same possible replies).
The responses for each particular Form can be recorded on a Google Spreadsheet, which allows the form creator to view the information entered and arrange it in different ways. In addition, Google created a quick analysis tool, which lets users get a simple visual representation of the responses entered. In this analysis, open-ended questions (short/long paragraphs) are displayed in a list, while assigned replies (such as in multiple answers questions) are broken into a more visual way. More specific analysis can be done using manually in the attached Google Spreadsheet.

How Does It Work?

  • The Straightforward Way- The simplest way to use Google Forms is to create the form, enter questions with possible responses, and share it. Responses entered can then be viewed and analyzed in the attached Google Sheet.
  • Quiz Mode- Google Forms can also be created as quizzes. Users assign points for each question, create a “master” form with the correct answers, and Google does the rest.
  • Response Validation- The response validation tool allows form creators to assign a specific answer or format to each question (or a range of possible replies), which, if entered in the wrong format (or as the wrong answer), stops the user from being able to move on to the next question. There are a variety of types of response validation options, so spend some time exploring this incredible tool.
  • Add-Ons- There are a variety of Google Forms and Google Sheets add-ons, which allow users to further tweak, personalize, and analyze the form. Here are a few examples:
    • FormLimiter allows you to limit the number of responses, set a deadline so that no more responses are accepted, and more.
    • Form Notifications will send automatic custom confirmation emails to you or the form users.
    • Form Publisher can input form responses onto a Google Doc, Google Sheet, Google Slides, or into a PDF in a neat way, based on a template you create.

Implementation Ideas:

Here are some great ways for teachers to use Google Forms. The titles are hyperlinked to an example I created for you. Feel free to copy those Forms and adapt them for your needs:
  • Brainstorm Session Choose a topic, type in the questions you would like to brainstorm about, have students record their ideas, and then view the responses together with the students.
  • Conference Sign-Up Sheet Using the add-on “Choice Eliminator 2”, you can create a question for each conference date, and using the recommended Dropdown-type question, input the times. Once a parent has signed up for a particular time, that time slot becomes unavailable the next time any parent fills out the Form.
  • Language-
    • Story Ideas/Topics for later Have students create a Form, and every time they have a story idea, they can record it in the form. When they need to choose a topic, they can look in the attached Google Sheet.
    • Pre-Writing/ Planning a Story Create a Form with questions that students can record their story idea (for example, “Title/Topic”, “What”, “Where”, “Who”, “Beginning”, “Middle”, etc.)
    • Branched Stories/ Choose Your Own AdventureCreate a story with multiple “paths”, use the Sections to take readers to the right place.
    • Recording Books Read Create a form with questions such as “Title”, “Author”, “Year Published”, “Number of Pages”, “Level”, “Book Review”, etc. for students (and you) to keep track of the books they have read
  • Breakout EDU- Use the Response Validation tool to create exciting adventures that unlock only when students have all the correct answers. This is a great place to get you started.
  • Assessments-
    • Anecdotal Records Make a list of behaviors you would like to observe, and tick them whenever you observe students. The timestamp on the spreadsheet would remind you when that happened.
    • Exit Slip Before the end of class, have students answer a question about the day’s lesson.
    • Quiz/Test Use the Quiz functionality to create a quiz and assign points for each question.
Google Forms will continue to evolve as new possibilities arise and Google puts those ideas into practice. I hope this post helped you to understand what Google Forms is and how to use this excellent tool in the classroom.
If you have any more creative ideas of what you do with Google Forms in your classroom, or would like to tell me what you think about this blog post, please leave a comment.

Friday, September 1, 2017

Twitter: Getting Started


Twitter continues to make waves in different industries, and is up there with (or should I say “behind”?!) Facebook in serving as an incredible tool for finding and sharing information, and staying in touch with people.
Before I begin explaining how to set up and get going with Twitter, there are some basic questions to ask- the What and the Why…

What is twitter?

Twitter is a free social networking service (can be called “Microblogging”) where users can read and post private and public messages (called “tweets”). Tweets are limited to 280 characters (in addition to attached media like images, GIFs or videos).
Let’s look at some important features and vocabulary in Twitter:
  • The Feed/ Stream- once you follow users or post tweets, those tweets are organized on your feed (similar to Facebook, with the newest one at the top).
  • Specialized Symbols- Searching and tagging keywords or other users can be done through the use of the “hashtag” (#) or the “handle” (@).
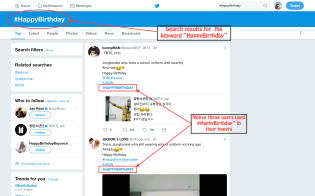
  • The Hashtag (#)- Placed directly before a keyword (i.e., #HappyBirthday), the hashtag allows users to organize content by displaying all the search results users tagged with the keyword (using the hashtag). So if users search for #HappyBirthday, ALL tweets (yes, this is a public platform) users inputted “#HappyBirthday” would be displayed.
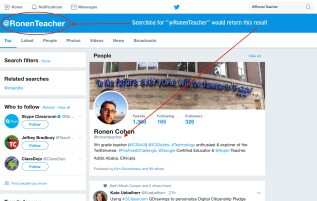
  • The Twitter Handle (@)- Placed directly before an existing user’s name (i.e., @EduRonen), the @ allows to search for or tag particular users. If you search for “@EduRonen”, your results will display the user (@ EduRonen)’s feed (since this is, again, a public forum…)
  • Private messages- Users can send and receive private messages. Those messages DO NOT appear on your stream (hence Private…). This is the only way to use Twitter and not have the rest of the world be able to see it. But remember, ALL your non-private messages are for the world to see!
Screen Shot 2017-09-01 at 9.07.09 AM    Screen Shot 2017-09-01 at 9.01.37 AM

Why Twitter?

There are several reasons people use Twitter to share and find content:
  • News and instant updates- Following a particular newspaper, organizations, etc. would allow users to receive news from that user right when they are posted. For example, if you follow the user @BBCBreaking, your feed would display ALL tweets (and tags) by the BBC Breaking News user, thus keeping users informed at a “real time”.
  • Keeping in touch- Most users use Twitter as a way to keep in touch with family and friends. They subscribe to (“follow”) each other, and receive images, videos, news, etc. posted by those users.
  • Professional Networking- Many users use Twitter to either keep abreast news about their field(s) of interest, their work, or to share their work with others. Many educational institutions around the world now encourage educators to make use of this service in order to advertise the great things done in their classrooms, at school, to keep parents informed. Private entrepreneurs, writers, and other professionals, use Twitter to share their work, advertise their services (by following [sometimes random] users), hoping they would follow them back and stay informed of their work.
So… If you think Twitter is for you, read on!
Once you decide you are interested in being a part of Twitter, it is important to think about your goals for using it. Is it for personal use? For work? Both? It is important to decide that now because this would determine which users you would follow, who would be interested in following you, what content you would be posting, which e-mail address you would use (I use my school’s e-mail address, since I use Twitter mostly for professional learning and sharing).
Now that you have a purpose, you are ready to create your very first Twitter account (Hurray!)

Creating an account

Screen Shot 2017-09-01 at 9.30.22 AM.png
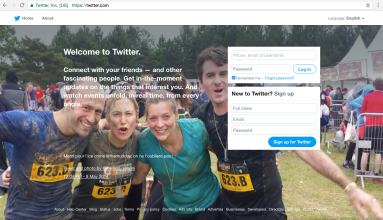
Creating an account if very simple. Go to Twitter.com and follow the steps to sign up. Choose a username and password, and enter your existing e-mail address.
Follow the instructions on the screenshots below, or read the notes if you are not sure what to do in any of the steps:
  • Entering your Full Name: This is the space to enter your “real name”.Screen Shot 2017-09-01 at 9.50.45 AM
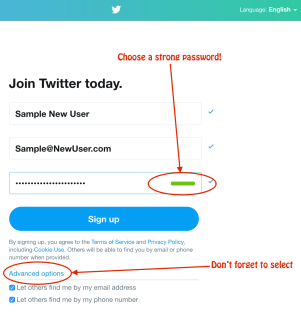
  • Entering your e-mail address: Remember- is it a professional or a personal account? Where would you like to receive notifications and maintain your account? This can be changed later.
  • Entering a Password: Choose a long and safe password. The green stripe indicates how likely it is that your password would be difficult to hack (no password is completely safe these days…)
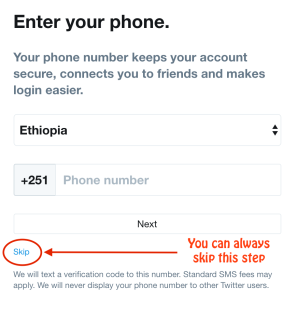
  • Notifications: Choose if you would like to receive phone and/or e-mail notifications (the default is both…). If you are using a mobile device, a Notification message would pop-up. If you enable notifications, your phone would send you notifications when someone tags you in a post (using the @ symbol), when someone replies or retweets a tweet you were mentioned in, or if someone sent you a private message. Is it for you? Either way, remember you can change this in your phone’s Notifications settings and under the Setting menu options in Twitter later on.Screen Shot 2017-09-01 at 9.57.41 AM
  • Screen Shot 2017-09-01 at 9.58.45 AMChoosing a Username:Make sure you choose a relatively short name, since in most cases it will be a part of the allotted 140 characters for each tweet. Choosing the username @TheBestBusinessManEver would mean users who wish to tag you now have less than 120 characters left for their message… Choose a username that reflects the reason you chose to use Twitter- for professional use? For personal use? Check if you could use your first name, last name (or both) as your username, or insert something that hints about your profession (something like @ EduRonen, @RonenCohen, @RonCohEd, @RonenTeacher, etc.)
  • Not Choosing a Username: You can skip choosing a username, and Twitter will assign you one. You can change that username later on.

Finding Users to Follow:

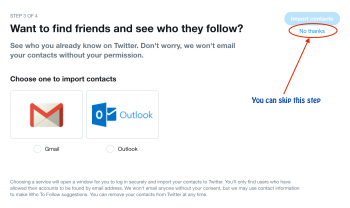
In the process of creating your account, Twitter will be suggesting a variety of people for you to follow. You can always skip these steps.
  • First (Step 2 of 4), Twitter will ask you to choose topics you are interested in, so it can suggest users to follow based on that interest.
  • Second (Step 3 of 4), it will ask you if you would like to find users you already know based on your e-mail’s contact list.
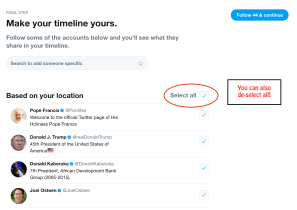
  • Finally (Step 4 of 4), it will suggest users based on your location. Here you can choose if and who you would be following.
Screen Shot 2017-09-01 at 9.59.20 AM.pngScreen Shot 2017-09-01 at 9.59.38 AM   Screen Shot 2017-09-01 at 10.00.04 AM
Once you are done choosing users to follow, you will get another notification message. This time, it is for your browser (Twitter notifications would pop up when you are using your browser and are online)…
Screen Shot 2017-09-01 at 10.00.22 AM
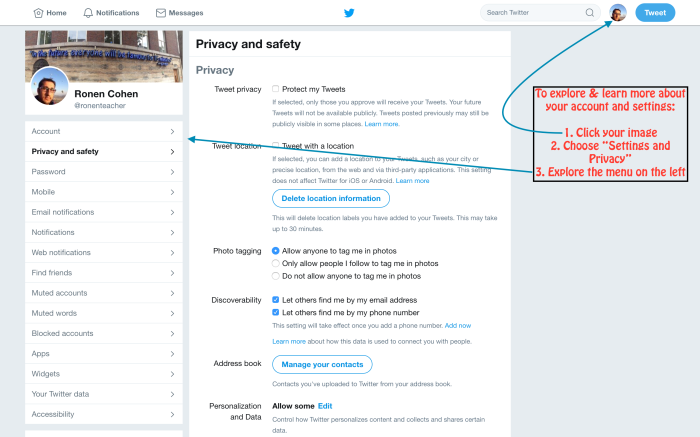
So now, you are technically ready to start tweeting, following, etc. I think this would be a good time to take a break and explore different areas in the Twitter user interface. Here are some suggestions:
  • Check different settings of your account and adjust them to fit your needs and wishes;
  • look at Twitter’s suggestions on the right and left of the feed area, etc.; and,
  • personalize the look of your account.
Screen Shot 2017-09-01 at 11.27.08 AM

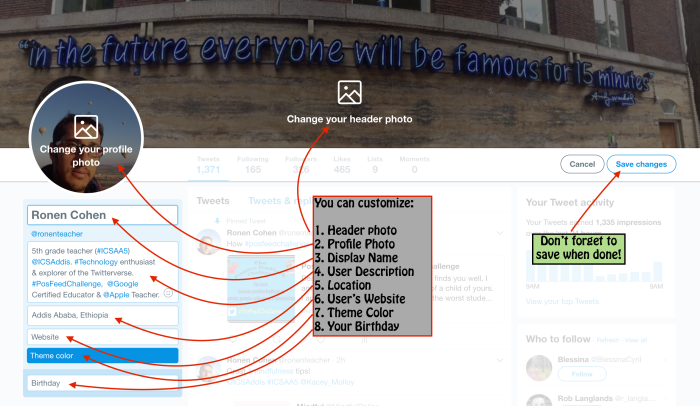
Personalize Your Look

The look and feel of your user account can change based on your taste and needs (it is not only for you; it shows on everyone’s Twitter when you tweet, when they look at your profile, etc.). Let’s look at what can be customized:
  1. Header Photo
  2. Profile Photo
  3. Display Name (your real name, if you'd like)
  4. User Description
  5. Location
  6.  Your Website
  7. Theme Color
  8. Birthday
To get started, click on “Edit Profile”: Screen Shot 2017-09-01 at 11.27.46 AM
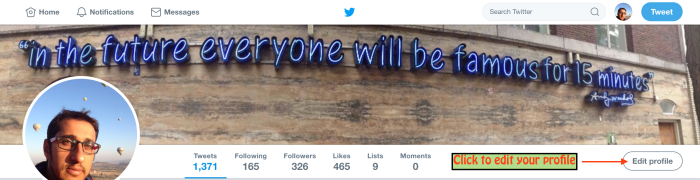
Then, start tailoring your Twitter look to your liking!
Screen Shot 2017-09-01 at 12.52.35 PM
*** If you are not sure about the user description part (#4), for now you can just write who you are and what you do. As you get more experience using Twitter, you’ll know exactly what to do.
Are you ready to connect? To find out? To share? To learn? Here we go…

Becoming a Twitter User:

Following users and keywords:

If you chose to look for users via your e-mail or phone contact lists, and selected topics and users of interest, you are already “on Twitter”! Let’s look for some more great users to follow! How do we do that?
  • At the right side of your screen, you will also have ideas for users to follow
  • Are there any colleagues you would like to follow? Do you have a friend who is very active and you know s/he has many Twitter “friends”? Go to their profile and find who they follow or who follows them
  • you can look for people, topics, and events using the “Search Twitter” box near your profile picture. Feel free to input words using the hashtag (#- for key words), the handle (@- for users), or without using these symbols. Start exploring and find people you find interesting or follow-worthy.
Screen Shot 2017-09-01 at 1.18.23 PM.png
Being an “active” Twitter user means you also contribute to the experience, not just follow people and read/view what they have to share. If you would like to get followers, you will need to put yourself out there- “re-tweet” and “like” other users’ tweets, and tweet what you have to tell the world (or your colleagues, strangers, or your friends…).
So the million dollar question- How do you get more followers? Well, unless you are a celebrity outside of Twitter, you’re gonna need to work for it. When you start sharing interesting and valuable information, people will start following you- in very much the same way you follow them.
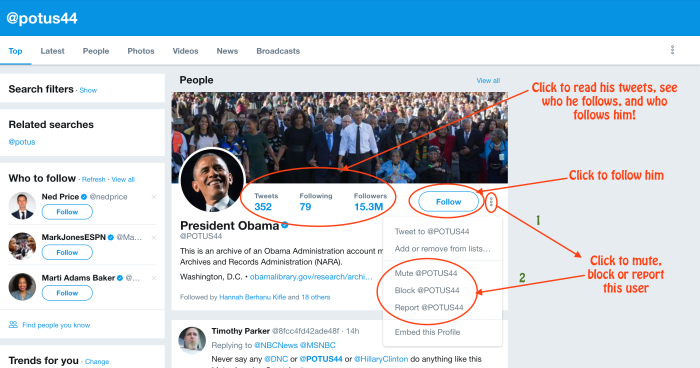
So before we get into the HOW of Twitter, let me just tell you that in the exact same way you can follow people, you can also “unfollow” them. All you need to do is to get to their profile (or hover over their name in any post) and click “Unfollow”. It’s that easy- you’ll stop receiving their tweets on your feed. Also, if you would like to block, mute (follow them but not see their posts), or report users, click on the 3 vertical dots (like in the screenshot above), and do it.
OK. Our last “beginner” topic is… Posting Tweets!

Posting Tweets, Re-Tweeting and Liking Tweets

What is a “”tweet”?

A tweet is a post. Simply said, it is you expressing yourself in 140 characters or less.
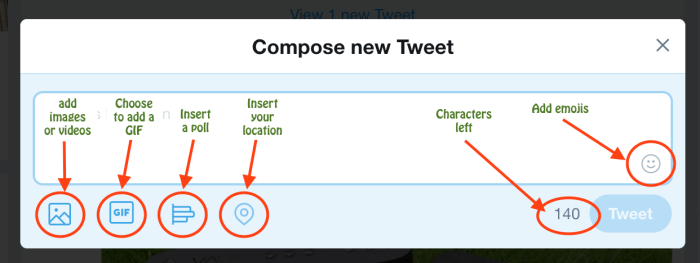
What’s In a Tweet:

In your tweet, most users use words to express themselves, but there are other options. In every tweet, you can:
  • add images and/or videos (up to 4);
  • insert a GIF (which is basically a series of images stitched together, on a loop). The GIF option you get when you tweet would allow you to choose from a variety of pre-loaded GIFs;
  • create a poll (compose a question and add several possible answers for others to share their views);
  • Share your location;
  • add emojis (these can save valuable character spaces!);
  • insert links (those count as a uniformed 23 characters, and provide users a preview to the destination URL)
Screen Shot 2017-09-01 at 1.38.05 PM.png

Tweeting:

There are a few different ways to “tweet”- you can compose your own tweet, reply to a tweet, “like” a tweet, and you can “re-tweet it”. When you retweet a tweet, you have the option of simply retweeting it, or to add up to 140 characters as a response (you can always tag other users or keywords).
Screen Shot 2017-09-01 at 7.51.40 PM
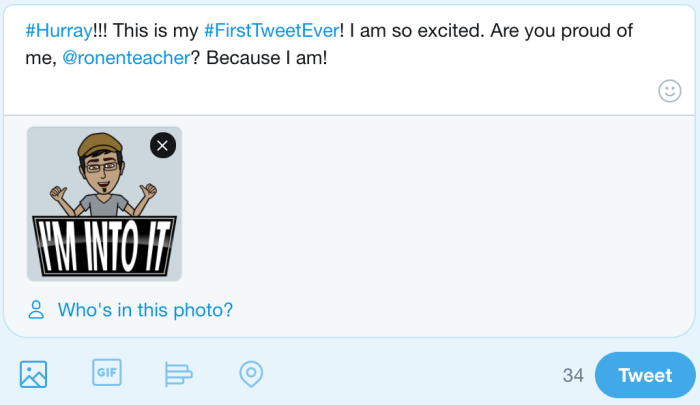
Finally, let’s get ready to compose our own tweets. How do we do that exactly?
  • Being Economic: Now that we have 280 characters to express our thoughts, opinions and feelings (increased from 140 characters), you still sometimes need to consider the number of characters you use. The Twitter community has been using different ways to abbreviate or shorten words for that purpose. Consider what these mean: “gr8”, “u”, “2”, “FaTH”, “IMHO”, “WDYMBT” (OK. I had no idea what the last ones meant until I ran into this article…), so in times of need, be creative!
  • Tagging Users (@): There will be many occasions when you would like to let people know about a particular tweet you are about to share. For example, you found a great new article about Polar Bears, and would like your colleague Jack to know about it. All you would need to do (aside for knowing his Twitter handle/username) is to add @JackMyColleague (or whatever his real username is) anywhere in your tweet, and he will get notified right away. You could “tag” multiple users, given you still have room in your allotted 140 characters.
  • Tagging Keywords (#): There will also be times you would like to tweet about a particular keyword, so when others look for it, they can easily find it. Those keywords don’t belong to anyone, they are just a regular word you (and others) choose to turn into a keyword. For example, if you are tweeting about being extremely exhausted at work on a Friday afternoon, you could add the hashtag “#TGIF” anywhere in your tweet. This way, anyone who looks for posts with “#TGIF”, would find yours as one of them. Popular hashtags vary from place to place and across time, but they will always stay as keywords on Twitter.
This is seriously all you need to know in order to get started on Twitter. Like other areas of life, the more you use it, the more new things you learn!
Lastly, if you read this tutorial, and you notice any inaccuracies or anything that is too difficult to understand or missing, please let me know. And… if this post got you started on Twitter, please tag me (@EduRonen) in one of your posts so I can celebrate with you!
Enjoy the ride!!!


Screen Shot 2017-09-01 at 8.06.13 PM.png