What is “Assistive Technology”?
I vividly remember being back in Elementary school, sitting at my desk during a writing assignment, and complaining that my hand was too tired of writing so much. I also remember that two of my classmates had serious learning challenges. One was mostly deaf and the other had a physical deformity, which caused her serious fine and gross motor problems. Both of them had few opportunities to gain meaningful access to the curriculum, let alone an “equal” access. That was in the mid-1980s. almost 30 years have passed, and the picture has dramatically changed. The development of computer-based technologies has allowed people with disabilities to gain access to more information, to manipulate objects and tools, and to express themselves in ways other people can understand, relate to, and appreciate. Such technology is called “Assistive Technology”.
The term “Assistive Technologies” is defined by the American Assistive Technology Act of 1998 as, “Any item, piece of equipment, or product system, whether acquired commercially off the shelf, modified, or customized, that is used to increase, maintain, or improve functional capabilities of individuals with disabilities.”
There are many types and degrees of “disabilities”, and designers of Assistive Technology have been creating more and more tools as solutions for the myriad of ways individuals struggle. The PBS Parents website separates these devices into 8 categories: Access and Environmental Control, Aids to Daily Living, Assistive Listening, Augmentative/ Alternative Communication, Computer-Based Instruction, Mobility, Positioning, and Visual Aids.
A variety of software and hardware companies, such as Microsoft, Google, and Apple, as well as many smaller ones, have recognized the need to develop such tools, and have pledged a commitment to ensure easier access for their users. The Accessibility sections of their websites are easily accessible, organized, and simple to navigate. In addition, they ensure that many of the accessibility functions come built-in and easily accessible, so users are able to make use of such features without the need to purchase additional software.
Your Device’s Accessibility Features
Before you and your students look at hardware, software or add-ons to purchase and install, you must first get yourselves familiar with your device’s native, built-in features. The links below include links to resources for different devices and platforms. They include excellent tools to support users with a variety of challenges, so spend time on these websites before going on.

- Accessibility features for Chromebooks (by Google). Video. An external video overview.
- Accessibility features for Samsung Galaxy (by Samsung). An external video overview.
- Accessibility features on a WIndows device (by Microsoft). An external video overview for Windows 10.
- Accessibility features on a Mac (by Apple). An external video overview (for Sierra).
- Accessibility features on an iPad (by Apple). An external video overview.
Accessibility Tools: Google Chrome Extensions
Google’s commitment to supporting users with a variety of different needs is illustrated by the numerous accessibility features their devices offer. In addition, Google’s Chrome Store has additional third-party extensions that make devices and the Internet more friendly and accessible to their users.
Below I outline 14 excellent Chrome Extensions that make computer use an easier and a more pleasant experience- not only for those with severe challenges, but also for anyone who needs simple modifications and some assistance when working on their devices.
How to add a Chrome Extension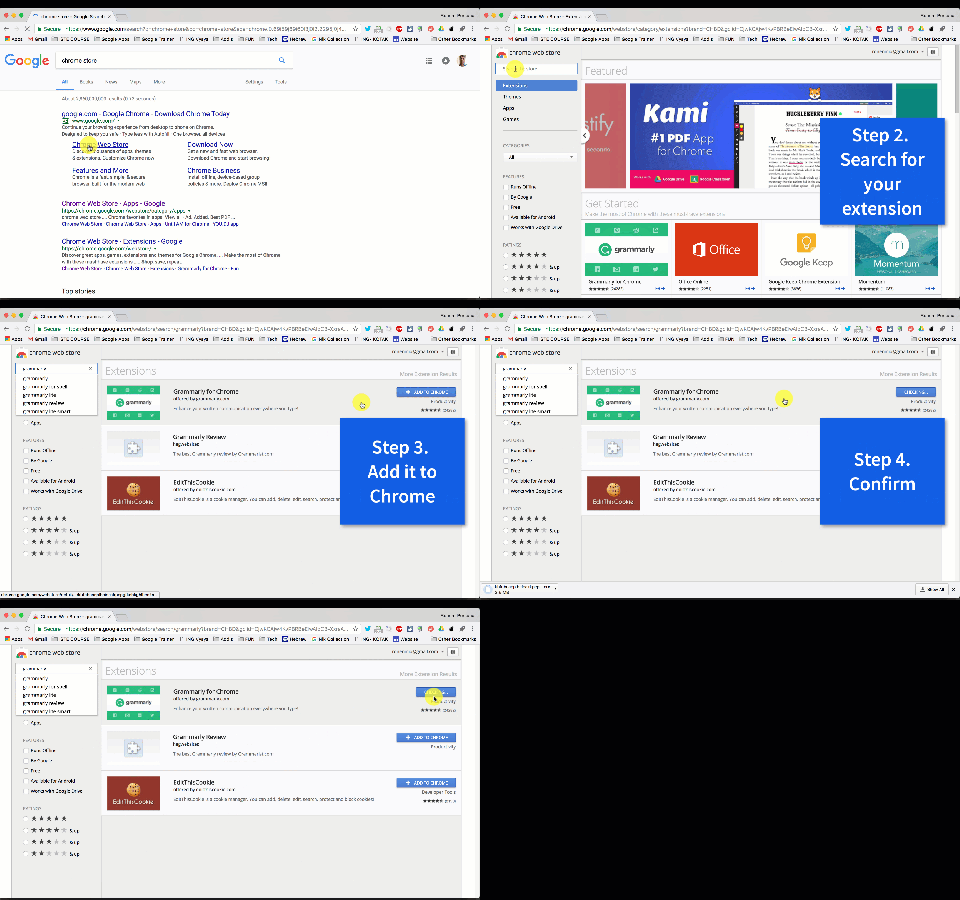
14 Chrome Extensions for different learning needs
 Visual Difficulties
Vision is an extremely helpful Chrome extension that lets users choose a particular color scheme they feel comfortable with, and then adjusts every Chrome page’s colors to fit that scheme.
***Note: This extension changes the settings on your device. If you choose to delete it, first make sure you reset the colors to their original scheme.
NoSquint Plus allows users to set and remember site-specific color schemes and zoom levels so that they can read in a more convenient and personalized way. You can easily set zoom levels, background and foreground colors.
YouTube Colors Filters is a simple Chrome extension that lets you adjust many different visual aspects (brightness, contrast, saturation, and more) in every YouTube video you watch.
Screen Shader – F.lux for Chrome is a popular Chrome extension (works offline as well!) that allows users to change the color of their screen to match the time of day. It also gets rid of the screen’s automatic white and blue light that can cause eye irritation.
Select and Speak is a text-to-speech Extension. All users need to do is highlight the text they would like to be read aloud, and they’re done. This extension has a more natural human voice (male or female), and users can choose voice and speed options as well as select from several different languages.
OpenDyslexic is an excellent extension designed for dyslexic users. It changes all font on the page into a more easily readable font.
Snap&Read Universal is another text-to-speech extension, but with an added twist. Highlight text you want to be read to you (including text within images, which other tools have difficulty reading), and it will both read it to you AND highlight each word as it is read. Brilliant!
 Hearing Difficulties
Substital is a Chrome Extension that automatically adds subtitles and closed captions to online videos on a variety of video content providers (YouTube, Netflix, Amazon Prime Video, and more). It allows users to synchronize the captions with the audio and adjust font size (and other features). You can also add your own subtitle files or search for existing ones in-app. Works with some success, but better than other similar services.
 Physical Difficulties
For fine motor (finger manipulation) difficulties, the device’s native speech-to-text features can be of great assistance. Here are two Chrome extensions that can help with fine motor obstacles:
Dictanote is a note-taking extension. You can quickly switch between using your fingers and your voice to type. It has a built-in word processor, and you can download your notes. The paid version allows you to organize your notes into notebooks and save them in the cloud.
Vimium can help users who have difficulties operating the computer’s mouse. The use of the mouse is replaced by a variety of keyboard shortcuts.
 Attention/Focusing Difficulties
Simple Blocker can keep users more focused for longer periods of time. You can quickly block an unlimited number of entire websites, sub-domains, or particular web pages. You can also set a blocking timer to reward yourself after a focused period of time. Password protected.
Boom- Declutter Pages, Improve Readability allows you to select anything you see on your page and make it disappear in one simple click. Quite amazing, actually! It also allows you to read content without signing into websites (like Pinterest), delete advertisements, and more! (a personal favorite!)
Rocket Readability is a simple extension that gets rid of unnecessary clutter- an entire web page turns into a text-only page with only the article to read. No images, no videos, just words.
Mercury Reader is another extension that makes it easier for users to have a less distracting working environment. Its features include ways to remove ads, comments, and noises; adjust typeface and text size, and change between dark and light themes.
I hope you find these Chrome Extensions useful and helpful. If you have any questions or know about other favorite and helpful Extensions, please share them in the comment section below.