Showing posts with label Differentiation. Show all posts

Tuesday, November 6, 2018

Passion Projects: Design Your Own Version (After-Thoughts)

I wrote two blog entries about passion projects and how to set it up with students. You can find the posts here (part one) and here (part two). Now it's time to reflect so that the next iteration of passion projects would be more successful.

There is no doubt that learning about, and walking with my students through their first experiences in a more personalized learning setting has been quite demanding but even more rewarding. In order for students to properly 'learn how to learn' and to become the drivers of their educational vehicle, many things must be planned and taught. Here are 4 lessons I've learned from my own experiences:

Go Slow to Go Fast

I can't emphasize enough the importance of properly planning the experience. In previous posts, I wrote with great detail what I did to prepare for this great personalized learning experience. Try to think of everything you can- from tuning into or uncovering students' passions, to guiding them through the research projects, through getting outside experts, to your role and assessments. The more ready you are, the more flexible you will be able to be!

Student Agency

It was quite incredible to see the kids tuning into themselves and taking ownership of their learning. When you let go of expecting one particular outcome, the learners fill in the "holes" with their own interests, and guiding their learning according to their interests, passions, abilities and personalities. Let them be the drivers and you take the role of a researcher- taking note of how each progresses in his/her own pace, how slowly they become better agents of their own learning.  

Fail Forward 


When learners don't get to have a say in their own learning journey, they become detached from their own selves, and this is what the school experience become for them. Once you transfer the steering wheel to them, encouraging them to have a voice and to exercise choice, they inevitably become better and better at identifying their passions and at achieving their goals. When students spend enough time researching something they are not passionate about, they become less and less engaged in it. Talk to them about it, make sure they themselves notice it and act upon it. Let them struggle a bit, and then let them move on to something they are (more) passionate about. Make sure to emphasize the benefits of this learning, and celebrate it! Reflection is extremely necessary and is an excellent tool that would allow them to move forward.


Notice the Learning


As teachers, we sometimes choose to focus on what did not go well. That's OK, as long as you also take the time to reflect on the great things that happen. Students learn so much more than mere facts about their chosen topic/issue. They improve their research skills, their knowledge of issues, make connections to other areas, learn from each other, take risks, and most importantly, they learn about who they are both as learners and humans. The learning experience is absolutely worth it!


Equipped with these new learning, I look forward to designing new experiences to take my students forward.


How about you? What have you learned from designing passion projects for your students? Please share your experiences or questions!


Monday, May 14, 2018

Passion Projects: Design Your Own Version (Part 2)


In the first part of this blog series, I discussed general information about starting your own individualized learning project for your students. I included a rationale, suggested some first steps, and shared a presentation you could adapt to your needs and share with colleagues or parents. It included everything from what Genius Hour is, to a suggested timeline, research and design frameworks, to inspirational videos and more.

In this second part of the series, I will share the details, or the “behind the scenes” of designing your own Genius hour experience for your students.

Finding the Time:

At my school, we dedicate one hour four times a week to something we call "I/E" (Intervention/ Extension). This is a time when students with heavy learning needs are pulled out of the classroom and are given additional instruction in the areas they need ("Intervention"), while those who stay behind get challenged in different areas at a higher level ("Extension"). The only rule we had to follow was that we were not to teach them any new curriculum-related material (so that struggling students don't miss it). After spending months differentiating instruction to small groups based on student needs, I felt like it was not a satisfying experience- neither for me nor for my students. I/E time was a perfect place to experiment with my Passion Project idea.

Finding the time is an important first step because the way you structure your project time will depend on how often and how long you can, or are willing to, allow your students to work on their projects. For me, about one hour, 4 days a week has been perfect.

45 minutes a day, four times per week, is one way to organize the schedule 

Creating a Timeline:

Depending on the time you have each day/week for this work, as well as the number of weeks you can afford running it, your project timeline would look differently. I recommend allotting one week on both ends for introduction and presentations/reflections, sufficient time for research, and ample time for product ideation, creation, feedback, and improvement:

  • Week 1: Introduction: The process/product/presentation, and the supporting documents.
  • Week 2: Choose a project and get it approved
  • Weeks 3-4: Intense research time
  • Week 5: Finish research and start prototyping (product)
  • Week 6-8: Work on products (including giving and receiving feedback) and the Process Presentation
  • Week 9: Work on presentations, present and reflect

The Project:

Depending on students' ages, abilities, and experience with self-directed learning, as well as your experience, and material- and human- resources, you will need to make a decision about what to expect of students, and which types of projects would be “acceptable”. This is important because expecting students (at any age) who have never learned how to take notes on their own to be engaged in research for extended periods of time might be a recipe for failure; expecting students to learn how to compose music on the trombone without actually having one is impossible; and creating a stop-motion animation without having cameras simply cannot happen. Think carefully about all these elements before you approve any project idea!

Another important aspect of the types of inquiries and projects students engage in and create, has to do with the idea of Empathy, and with training students to think beyond themselves. I found Don Wettrick's 'Rule of Thirds' to be an excellent way to explain to students which types of projects are acceptable. According to Don, in order for a project to be approved, there are three basic questions students must consider and answer positively to. If any of the questions are answered negatively, the project is not approved. As simple as that.
Don Wettrick's 'Rule of Thirds' 
I initially tailored this to my own needs because I felt that since it was my students' first time doing a Passion Project. I kept the first two questions as-is, and modified the third. I asked them to simply be conscious about who would benefit from their project (including themselves) and to try to expand it so that others could benefit from it as well. I was happy to realize that emphasizing this point resulted in several students choosing projects that benefitted more than just themselves. As a general rule of thumb, for a second project, I make the third point a requirement.

Grouping:

If you are doing this project for the first time (for you or for a particular group), I would recommend you start with individual projects. Once students have gone through the process, and had the chance to explore their own passions and to research and create, and you gathered sufficient information about what they can and cannot do on their own, you may want to consider letting students work in pairs or trios, according to shared passions and interests.

The Platform:

It is important to make it easy for students to find the information they need quickly. This saves valuable time. You can choose to host the information and handouts you will be sharing with students in different places and ways. I chose to go digital and to create one central location for students to find all the information they'll need- guidelines, inspirational videos, research notes documents, presentation examples, etc. The platform I chose was the new Google Sites, as it now allows for page/site template creation, which makes it easy to keep all documents in one place.

The Passion Project Website is hosted on (the new) Google Sites 

What to Include:

I chose to have all the information in one central location and share it with students. Deciding to share all the information at once was a conscious decision, as I wanted this to be my students' "central command"- a place where they know they must visit in order to find out what to do, how to do it, what comes up next, what they already did, etc. Here are some of the pages I decided to include in order to guide and scaffold student learning:

  • Understanding what Passion Project is: Before students start thinking about and working on their projects, they must show an understanding of what this project time is. They should be able to answer basic questions after a teacher's introduction, watching videos, and class discussions.
  • Getting inspired and guided to find their passions and interests: To inspire students, I used different videos about where ideas come from, what is creativity, what projects other students have done, etc. I also created worksheets for them to brainstorm what they are passionate about, what they do in their free time, etc. 
  • Deciding on topics to inquire into and products to create: After brainstorming and sharing project ideas (it's very important to share!), students begin narrowing their topics to find what they would like to learn about and what they would like to create. Learning (research), creating (product), and sharing (presentations) were three requirements.
  • Narrowing their topic to something quantitative and achievable: Once students have a pretty good idea of what they would like to learn and create, I make them take it home and work with their parents to focus their topics into one specific statement, such as "I would like to design my own t-shirt", "I want to learn more about Norse Myths", etc. Sharing with their parents is important because I want their parents to understand what this project is and to be a part of the support team, and because I want the students to take this step very seriously.
  • Submitting a Proposal: Once I had discussions with each student about what they would like to learn about and what they would like to create, they are ready to submit a proposal. In their proposals, I ask them to tell me why they are passionate about the topic, what they already know, what questions they have, do a bit of research ("pre-search"), and propose what their product is going to be. Assuming students have a good project idea, when it is the first time they are doing it, I almost always make them revise their proposals, re-think different aspects of it, and come back with more passion and determination. 
  • Researching: This is an extremely important aspect of the project, and it needs to be taught very carefully based on students age, reading levels, prior experience with reading/note taking/synthesizing, and stamina (See "Choosing a Research Framework" below). (anything from asking questions about their topic to taking notes, synthesizing, etc.)
  • Creating a product: 
    • Choosing a Design-Thinking process: An important ingredient of this project is students' creation of a product. In order for students to create a quality product, choose a Design-Thinking process. A DT process allows designers to create a high-quality product through a repeated process of ideation, creation, and iteration. If your students have never worked with a DT process before, make sure you spend some time explaining each step and emphasizing its value. Here are a few of the design-thinking processes I found schools to be using. Feel free to choose one that fits your needs, and play around with it!
    • Remember and Consider: In students' Passion Project Proposals, they indicated what product they will create as a result of their learning. There are two important things you need to do here:
      • Make sure you have the materials before they begin working on their products.
      • Consider early prototyping (see above). What often happens is that students spend a lot of time on their research, give themselves very little time to work on a product. With little time to spare, they realize they don't have enough time to complete it. Creating their product early, getting feedback and revising it (sometimes again and again) to ensure it is high quality is very important, and sometimes results in an adjustment of the overall project. For example, I had a student who wanted to write a book about Norse Myths. She did a lot of research. At some point, I asked her to create a prototype chapter, so we see how it goes. She started writing the chapter, needed to do additional research, and two weeks have passed. We realized she won't be able to finish an entire book, so we adjusted her project to be a "published story about a Norse Myth". She finished and edited it, and met with her mentor, and received her illustrations from an older student I matched her with, just in time before presentations. Had she waited until she completely finished researching, she would have had no product at all...
  • Creating a Process Presentation: An important requirement for this project is sharing it with the rest of the world. In order to do that, I ask students to choose their medium of presentation, but give them guidelines as to what they must include in their presentation: 
    • the project they chose; 
    • the reason they chose it; 
    • the questions they had; 
    • important things they found out; and, 
    • their product.
----------------------------------------------------

I hope this post provided you with more ideas to think about and tools to plan your own personalized learning project. In the third (and final) part of this blog series, I will be getting into the details of designing a passion project. Elements such as which research framework and design-thinking process to use, how to guide, support and monitor students’ work and progress, and more!

Thank you for taking the time to read through this long and detailed post. I hope you found is useful. As usual, if you have any further questions or would like to share ideas that work (or didn’t work…) for you, please reach out by commenting here or on twitter (@EduRonen). This is a learning community, and the idea of a “destination” is only an illusion!


Monday, April 30, 2018

Passion Projects: Design Your Own Version (Part 1)


Until recent changes in the educational systems, few of students' interests and ideas were taken into account when the curriculum was designed. As a student, were you ever asked what you wanted to learn about? Even an inquiry-based curriculum, such as the IPC (International Primary Curriculum) or the PYP (Primary Years Program), which allow for student input in the curriculum, have failed to let students be the drivers of their educational journey.

Enter "Genius Hour"...


Genius Hour is a concept originally created by Google, Inc. The idea behind Genius Hour was to let Google employees explore their passions for 20% of their workload, as long as it was perceived to benefit the company (Google). Sounds pretty simple, but the results of this experiment turned into a fantastic avenue for Google employees' creativity and ingenuity. Several of today's successful Google products, such as Gmail, Adsense, or Google News, have been the result of Google's Genius Hour efforts.

The success of this idea has been infectious- many companies started their own version of Genius Hour, and recently, the education system has seen risk-taking teachers and administrators trying to implement these ideas into their own teaching load and curriculum. Genius Hour in schools, has been given different names ("20% Time", "Passion Time", "Passion Project", and more) and looked a bit differently, but was based on the same premise, that both the students and the institution benefit from pursuing their unique passions. Students choose something they wish to learn about, embark on a research journey, and end the "project" with a presentation and/or a product.


In this three-part blog series, I share my own journey and outline some ways educators could offer their own version of a personalized learning opportunity for their students. More specifically, in this first post I provide readers with general information about how to begin their journey, and share a presentation to introduce teachers to Genius Hour- including the process, timeline, suggested frameworks, and more. In the second and third posts, I get into the nitty-gritty of each component of the Genius Hour project: finding time in the curriculum, creating a realistic timeline, grouping students, determining acceptable projects, using appropriate research and design frameworks, using a platform to host, guiding and supporting students, using mentors and experts, presenting, and finally, ending this fulfilling journey with presentations and a celebration.

Yes, there is quite a lot to think about when one wishes to embark on such a journey. I am hoping you find this blog post series as a starting point that would help you conceptualize and create whatever works for you and your students.

So… Where do I Begin?

Embarking on a "Passion Project" Journey...

Last year, I decided it was time for me to explore what such project-based learning could do for my students' education. I did a lot of research and found an incredible amount of information about how Google's Genius Hour was reincarnated in different educational settings. I found frameworks, timelines, philosophies, project examples, presentations, and more. It seemed that everything I needed was out there for me to use. But the more I dug in, the more I realized that my idea of Genius Hour was a bit different than each of the documents and experiences I've found. What I needed to do was to pick and choose, to synthesize the information I found valuable, and to come up with a unique product that would fit my needs, my school's philosophy and my students' individual personalities and learning styles.

You will need to do the same. I recommend you read on to get an idea of what you should look out for, get some ideas, and create your own version of Genius Hour.

How to Start:

Follow the numbered points below to learn about Genius Hour/ Passion Project and to slowly set up the supporting structures that will accompany your students' journeys. 
  1. Get yourself familiar with what's out there. Spend some time searching the Internet for examples of "Genius Hour", "Passion Projects", and "20-Time" at different schools and in different levels. 
  2. Get organized. Create a folder on your computer and a bookmark folder to save and store useful websites and files, so that you can refer back to them throughout your planning and teaching. 
  3. Make sure you know what you are doing and why. Create your own "Passion Project Manifesto"- Explain to yourself why you are doing it, what the benefits would be, what essential knowledge and skills your students should gain upon completing the project, etc. Another very important thing to think about is the guidelines for projects (see below). This will be helpful when you are asked to explain what you are doing and why, as well as when you evaluate the work you and your students did at the end. 
  4. Start planning. Think about where this experience can take place in your workweek. Create a tentative timeline: Break the process into clear steps, and make a list of helpers and mentors you could rely on to support student learning. 
  5. Start creating! Now it's the time to start creating content for your students. This can be a long and tenuous process, so I will be sharing with details how I decided to design my passion project experience. 

Getting Everyone on Board

Creating a personalized learning experience is not an easy task. It requires not only to find the time and plan it well, but also to convince others that instructional time is not being wasted. Once you create your manifesto and outline your plan (with as many details as possible), test the waters with colleagues whom you feel safe with. Remember, being innovative does not mean you have all the right answers- it means you are stepping out of your comfort zone to plan and create experiences students would benefit from! It will not be perfect the first time, but it is completely worth it. If you take this seriously, you will realize that on your own.

I created a sample presentation you could use to get a better understanding of what a Passion Project looks like. You can feel free to adapt it to your own needs and share it with colleagues, parents, administrators, or anyone who wishes to learn more about what it is and how it can be done.


This is the first part of a two-part blog entry about passion projects. You can find the second part here.

I hope you find this blog post useful. I would appreciate any feedback and/or suggestions right here in the comment section or through a tweet to @EduRonen. This is a learning journey, and any input is important. Thank you!


Monday, November 13, 2017

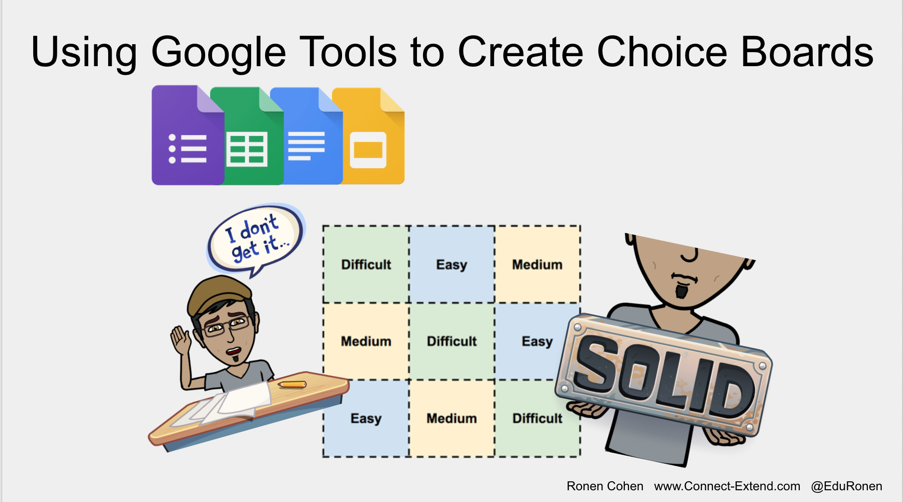
Use Google Tools to Quickly Create Awesome Choice Boards


John Hattie explains that in order to properly differentiate, "The teacher will have to provide different ways in which students can demonstrate mastery and understanding along the way to meeting the criteria for success.”

Using Choice Boards in the classroom is a great way to engage students while honoring their differences. Choice Boards can help teachers with the never-ending task of differentiating classrooms, allowing students to actively participate in the learning process, allowing them choice across the curriculum- in the content, the process, and the product, which in turn have a great effect on the classroom environment.

This being said, it is extremely important to remember the words of Carol Tomlinson (2016):

'Differentiation is not a set of strategies, but rather a way of thinking about teaching & learning.'
With this in mind, let's have a look at what Choice Boards are and how they can be used in diverse classrooms:

What are "Choice Boards"?

  • They are graphic organizers
  • They include a series of activities that focus on students’ specific learning needs, interests, and abilities.
  • Students decide which activity they are most comfortable completing first, and once they master it, they can move on to more challenging activities.

How to Create Choice Boards?

  1. Identify one instructional focus for your Choice Board
  2. Use data to determine students’ interests, readiness, and learning styles
  3. Design 9 tasks. Differentiate them based on the information you determined above.
  4. Use the templates on the upcoming slides to arrange the tasks.
  5. Students choose 3 tasks to work on- These tasks must be ordered horizontally (row), vertically (column) or diagonally.
When designing these boards, it is important to ensure that the tasks students choose are diverse, so that each can enhance each other and capitalize on a variety of student strengths. In order to do so, here are several ways you could structure your boards:

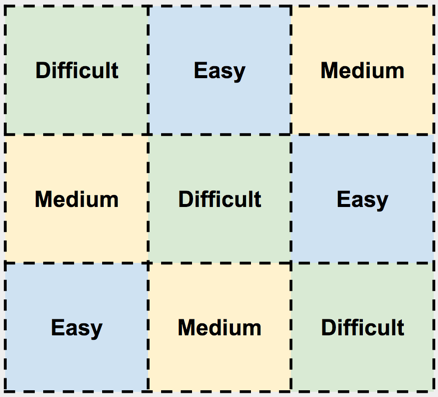
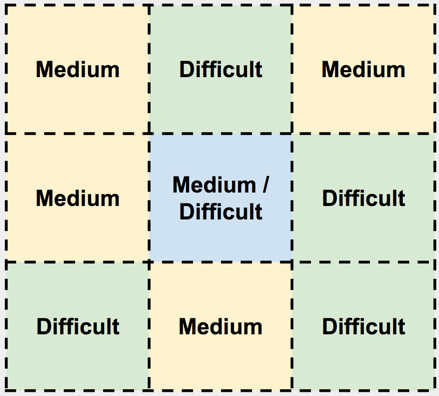
Task Arrangement: By Level of Difficulty:

The main idea behind this arrangement is that no matter which three tasks students choose, they will be working on at least one higher level tasks, whereas students who wish to take on more challenges, can choose all three tasks in the Difficult level.


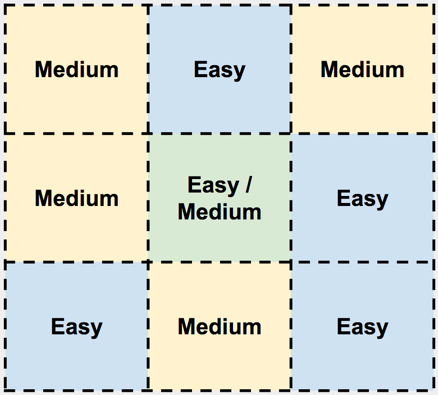
A variation of the above difficulty level arrangement is to further classify tasks according to level, and providing students with only two difficulty levels to choose from:

       Easy & Medium:
 

       Medium & Difficult:

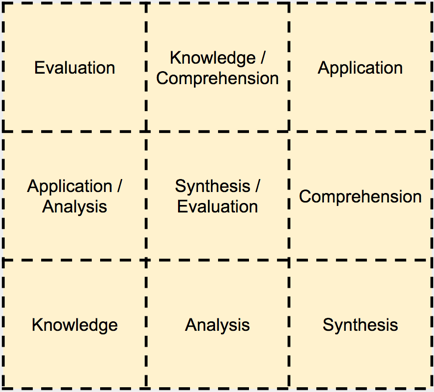
Task Arrangement: By Level of Questioning Skills:

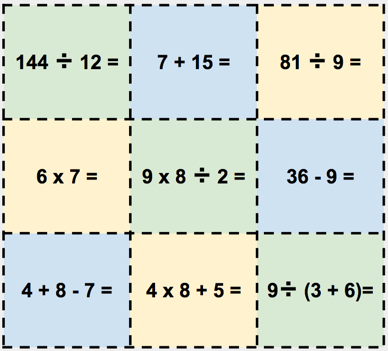
Another way by which you could create tasks is by questioning skills (Bloom's Taxonomy). This arrangement, once again, forces students to choose tasks in a variety of levels:


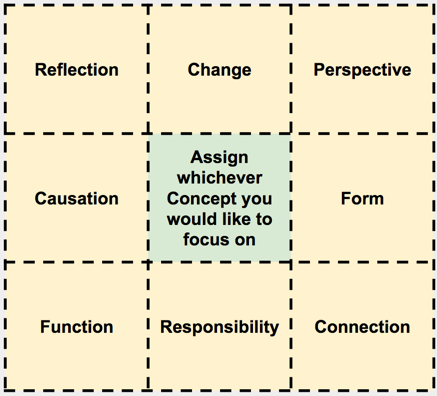
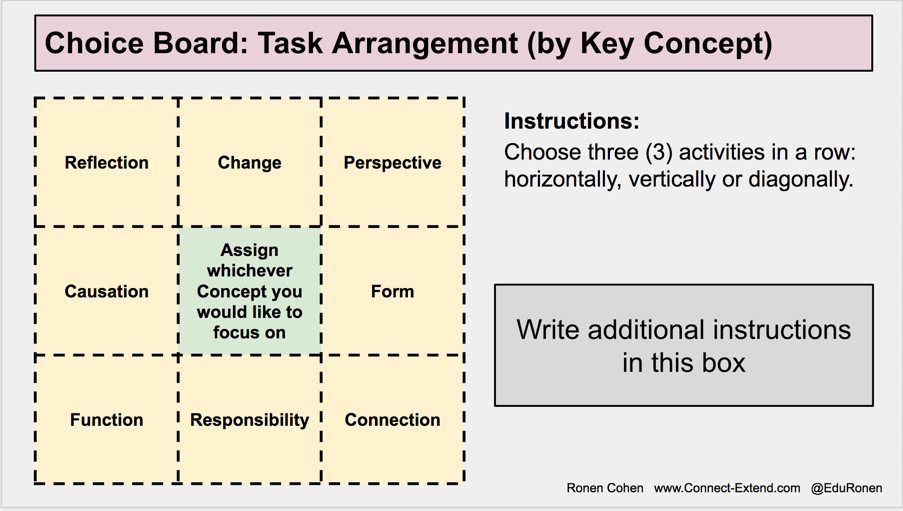
Task Arrangement: By Key Concepts

For those of you who work under the PYP/ IB framework, creating tasks that correspond to Key Concepts is an excellent way to ensure students examine issues from different perspectives:


The nature of these Choice Boards allows teachers the flexibility we need to create Choice Boards tailored to both our and our students' needs. Feel free to use the above arrangement ideas when you create your own boards.


Using Google Tools to Quickly Create Choice Boards

In this blog post, I explore 3 different tools teachers can quickly create Choice Boards: Google Docs, Google Slides, and Google Forms. Each method has its advantages, but they all end up with the same product: a simple way to create Choice Boards!

1. Using Google Docs to Create Choice Boards Templates

This method is the easiest of the three. You create a template and re-use it whenever you, or anyone else, needs.

In order to create templates in Google Docs, you need to be a part of GSuite (for organizations, schools, etc.). Here is how it's done:
  1. Open Google Docs
  2. Create your Choice Board template
  3. Go to Docs.Google.com (of your G-Suite organization) and click on “Template Gallery”, then “Submit Template”
  4. Select the document you chose, and voila!
Now, pending the approval of your organization's GSuite administrator, anyone in your organization can locate and use your template!

*** If you are a single Google/Gmail user (not a part of the GSuite), unfortunately, you can’t create a template. Instead, you’ll need to make a copy of your document.

Here is a short explanation of how to create a Google Doc template (for GSuite users):


How to create templates for your organization

 This short video shows how to make a copy of a document (for regular Google Apps users):


Here is the template you saw in the screencasts. Feel free to copy and use it.

2. Using Google Slides to Create Choice Boards Templates


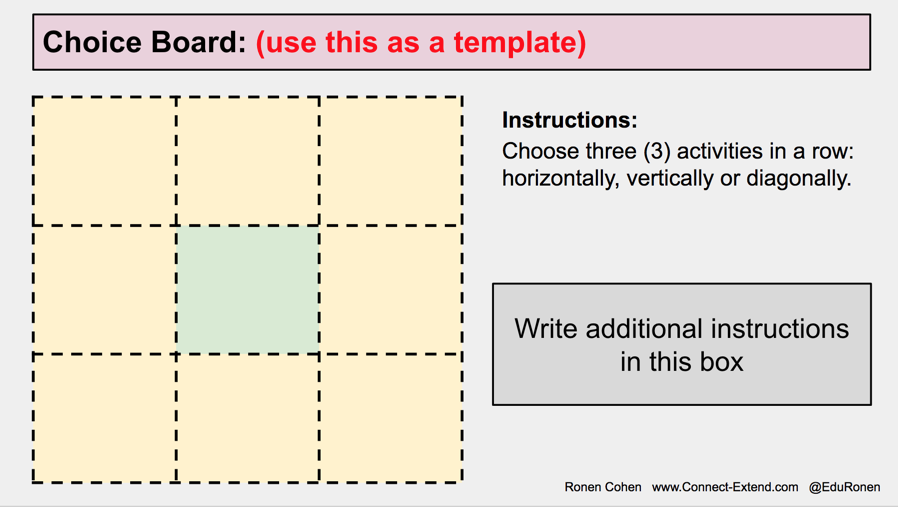
Another simple way to create Choice Boards is to create a Master Template in Google Slides, and to use and re-use it to create new boards (see images above). Once your Choice Board slide is ready, you can print it out, share it with your students through Google Classroom, etc.

Use this link to make a copy of the Google Slideshow below:


3. Using Google Forms to Create Choice Boards Templates

OK. This is the coolest part. Are you ready?
While working on some Tic-Tac-Toe boards for my students, I realized that the omnipotent Google Forms can come to my help once again. How? Using the add-on Form Publisher, I will create a Google Form with generic questions, and link it to a Google Doc template. Yes, it's that easy!

Use the Google Form and Google Doc template I created (below), and adjust it for your needs. You're welcome!

If you're not sure how to do it, follow the steps below to learn how it all works!

Before we start, here is the link to the Form and the Template. If you would like more information about what Choice Boards are and how to create different Tic-Tac-Toe menus, go through the Google Slides above. And yes, you can feel free to make a copy and use the Slides for your own purposes.

So... How does it all work? Simple:
  1. Make a copy of the Google Form I created.
  2. Make a copy of the Google Doc template I created.
  3. Create a new folder on your Google Drive and place both files in that folder. This organization pays later!
  4. Download the Forms add-on "Form Publisher"
  5. Open Form Publisher and link the Form to the template.
  6. Fill in the form
  7. Check your e-mail for your new awesome Choice Board
  8. Open the Google Doc and adjust its look (colors, fonts, information, etc.)
If you need a video tutorial, here it is:

How to use Form Publisher to create your Choice Board template

I hope you find these methods helpful. If you have any other cool ways to create templates for differentiation, please write them in the comments below.

If you would like to use this information as a presentation, here is a link to a Google Slides.

Feel free to reach out on Twitter @EduRonen!


Saturday, October 21, 2017

14 Chrome Extensions to Support Students with Learning Challenges

Blog- Learning Challenge Chrome Extenstions.jpg

What is “Assistive Technology”?

I vividly remember being back in Elementary school, sitting at my desk during a writing assignment, and complaining that my hand was too tired of writing so much. I also remember that two of my classmates had serious learning challenges. One was mostly deaf and the other had a physical deformity, which caused her serious fine and gross motor problems. Both of them had few opportunities to gain meaningful access to the curriculum, let alone an “equal” access. That was in the mid-1980s. almost 30 years have passed, and the picture has dramatically changed. The development of computer-based technologies has allowed people with disabilities to gain access to more information, to manipulate objects and tools, and to express themselves in ways other people can understand, relate to, and appreciate. Such technology is called “Assistive Technology”.
The term “Assistive Technologies” is defined by the American Assistive Technology Act of 1998 as, “Any item, piece of equipment, or product system, whether acquired commercially off the shelf, modified, or customized, that is used to increase, maintain, or improve functional capabilities of individuals with disabilities.”
There are many types and degrees of “disabilities”, and designers of Assistive Technology have been creating more and more tools as solutions for the myriad of ways individuals struggle. The PBS Parents website separates these devices into 8 categories: Access and Environmental Control, Aids to Daily Living, Assistive Listening, Augmentative/ Alternative Communication, Computer-Based Instruction, Mobility, Positioning, and Visual Aids.
A variety of software and hardware companies, such as Microsoft, Google, and Apple, as well as many smaller ones, have recognized the need to develop such tools, and have pledged a commitment to ensure easier access for their users. The Accessibility sections of their websites are easily accessible, organized, and simple to navigate. In addition, they ensure that many of the accessibility functions come built-in and easily accessible, so users are able to make use of such features without the need to purchase additional software.

Your Device’s Accessibility Features

Before you and your students look at hardware, software or add-ons to purchase and install, you must first get yourselves familiar with your device’s native, built-in features. The links below include links to resources for different devices and platforms. They include excellent tools to support users with a variety of challenges, so spend time on these websites before going on.
2017-10-21_09-30-44 (1)

Accessibility Tools: Google Chrome Extensions

Google’s commitment to supporting users with a variety of different needs is illustrated by the numerous accessibility features their devices offer. In addition, Google’s Chrome Store has additional third-party extensions that make devices and the Internet more friendly and accessible to their users.
Below I outline 14 excellent Chrome Extensions that make computer use an easier and a more pleasant experience- not only for those with severe challenges, but also for anyone who needs simple modifications and some assistance when working on their devices.

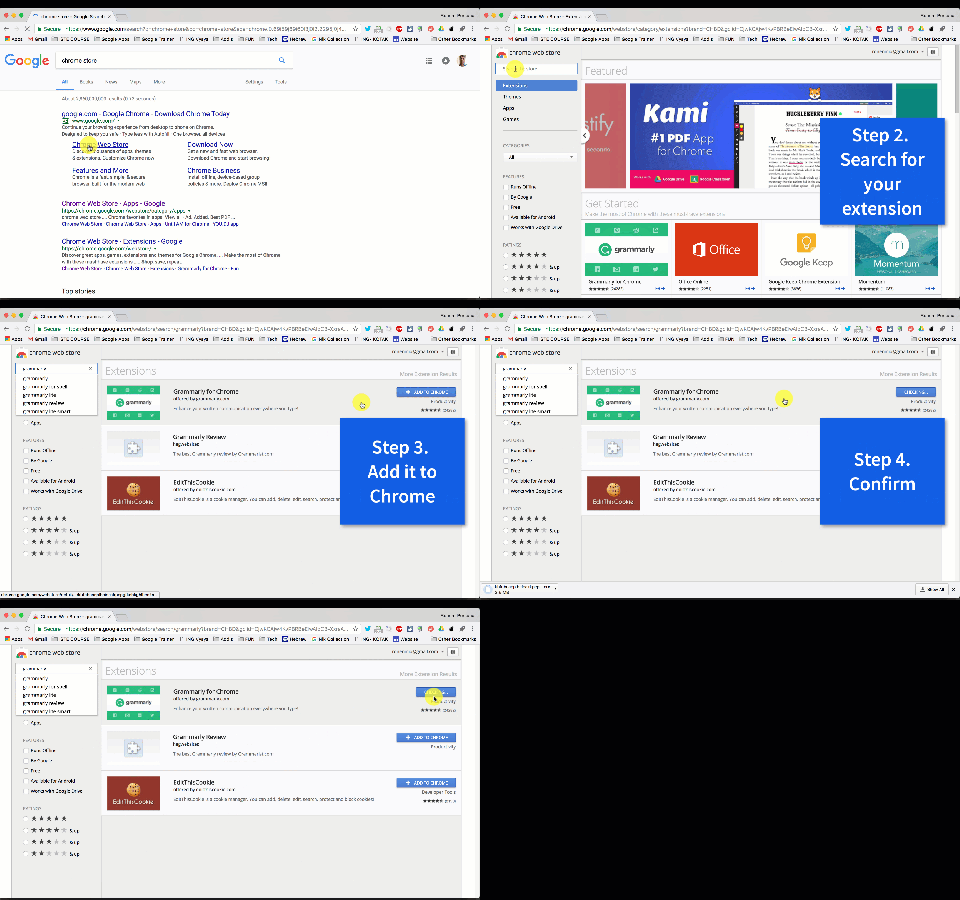
How to add a Chrome ExtensionGIF- Chrome Extension


14 Chrome Extensions for different learning needs

human-eye-clip-art-1384151134  Visual Difficulties

Vision is an extremely helpful Chrome extension that lets users choose a particular color scheme they feel comfortable with, and then adjusts every Chrome page’s colors to fit that scheme.
***Note: This extension changes the settings on your device. If you choose to delete it, first make sure you reset the colors to their original scheme.
NoSquint Plus allows users to set and remember site-specific color schemes and zoom levels so that they can read in a more convenient and personalized way. You can easily set zoom levels, background and foreground colors.
YouTube Colors Filters is a simple Chrome extension that lets you adjust many different visual aspects (brightness, contrast, saturation, and more) in every YouTube video you watch.
Screen Shader – F.lux for Chrome is a popular Chrome extension (works offline as well!) that allows users to change the color of their screen to match the time of day. It also gets rid of the screen’s automatic white and blue light that can cause eye irritation.
Select and Speak is a text-to-speech Extension. All users need to do is highlight the text they would like to be read aloud, and they’re done. This extension has a more natural human voice (male or female), and users can choose voice and speed options as well as select from several different languages.
OpenDyslexic is an excellent extension designed for dyslexic users. It changes all font on the page into a more easily readable font.
Snap&Read Universal is another text-to-speech extension, but with an added twist. Highlight text you want to be read to you (including text within images, which other tools have difficulty reading), and it will both read it to you AND highlight each word as it is read. Brilliant!

ear-svg_0  Hearing Difficulties

Substital is a Chrome Extension that automatically adds subtitles and closed captions to online videos on a variety of video content providers (YouTube, Netflix, Amazon Prime Video, and more). It allows users to synchronize the captions with the audio and adjust font size (and other features). You can also add your own subtitle files or search for existing ones in-app. Works with some success, but better than other similar services.

  Physical Difficulties

For fine motor (finger manipulation) difficulties, the device’s native speech-to-text features can be of great assistance. Here are two Chrome extensions that can help with fine motor obstacles:
Dictanote is a note-taking extension. You can quickly switch between using your fingers and your voice to type. It has a built-in word processor, and you can download your notes. The paid version allows you to organize your notes into notebooks and save them in the cloud.
Vimium can help users who have difficulties operating the computer’s mouse. The use of the mouse is replaced by a variety of keyboard shortcuts.

target-icon   Attention/Focusing Difficulties

Simple Blocker can keep users more focused for longer periods of time. You can quickly block an unlimited number of entire websites, sub-domains, or particular web pages. You can also set a blocking timer to reward yourself after a focused period of time. Password protected.
Boom- Declutter Pages, Improve Readability allows you to select anything you see on your page and make it disappear in one simple click. Quite amazing, actually! It also allows you to read content without signing into websites (like Pinterest), delete advertisements, and more! (a personal favorite!)
Rocket Readability is a simple extension that gets rid of unnecessary clutter- an entire web page turns into a text-only page with only the article to read. No images, no videos, just words.
Mercury Reader is another extension that makes it easier for users to have a less distracting working environment. Its features include ways to remove ads, comments, and noises; adjust typeface and text size, and change between dark and light themes.


I hope you find these Chrome Extensions useful and helpful. If you have any questions or know about other favorite and helpful Extensions, please share them in the comment section below.

Saturday, October 10, 2015

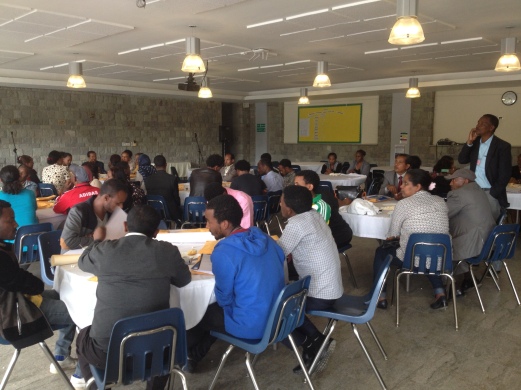
Differentiation Workshop to Local Ethiopian Teachers

I am very fortunate that my international school has such a strong and positive relationship with our local community. Last weekend I had the fortune to participate in professional development workshops, teachers at my school were giving to teachers of our local partner school, Mekdela.

The differences between the schools are obvious (and unfortunate). One is a wealthy international school serving sons and daughters of expatriate business people, diplomats, and the likes, while the other is a public Ethiopian “government” school serving over 1600 students on two rotations due to lack of space (a morning and an afternoon shift). From teacher salaries to classroom resources, the similarities are few and far in between. This being said, as expatriates living and working in the developing world, it is (what I see as) our moral obligation to share our knowledge and skills with our local teacher counterparts in whatever ways we can think of, and so these teacher workshops were a wonderful addition to my weekend.

The professional development day included over 80 teacher participants from the Mekdela school. There were about 15 workshops offered by my school’s teachers and teaching assistants. Each workshop was designed to last two hours. Expatriates who did not speak Amharic were provided with one of our school’s TAs, who served as a mediator and translator to the participants. We were to have two such workshops throughout the day.

I chose to share my knowledge of differentiation theory and practice. Immediately after volunteering to share my knowledge at the event, I was struck with the simple and obvious question- How do you differentiate instruction when you are a traveling (“a-la-carte”) teacher who have little to no resources and 40-60 students in a classroom??? I started by taking a deep breath!

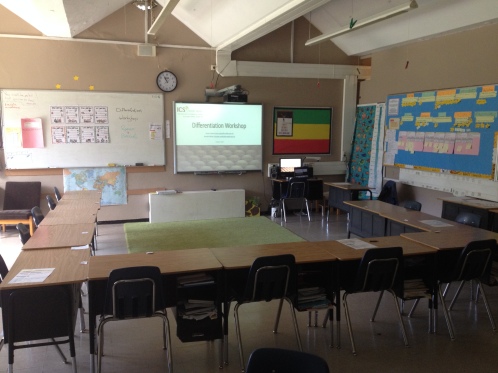
After a short visit to classrooms at the local school, several hours of presentation planning, and middle of the night consultation with colleagues, I realized whatever shape the presentation would take, it would have to be interactive (to keep the audience engaged, to build on their knowledge, skills, interests, and needs), and to include both theory AND practice sections (background is important, and so does the application aspect!) And so by the morning, my presentation was born and the classroom prepared with visual aids and concrete resources for the teachers to browse through.


Although I was concerned with the time element, I felt that all the background information and theory, as well as the interactive nature of the presentation, were necessary. And I must say that the workshops went quite well, aside for the fact that I did not take into consideration the delay in participants’ arrival and the time it would take to translate everything I was saying… What I assumed would be two full hours, were actually about 70 minutes of material…

Unfortunately, in the first presentation teachers had little time to work on concrete and authentic strategies for their own classes, which was quite disappointing to me. So I was happy that I had the time to create a packet of handouts for each participant, which included both theory and practical advice for a variety of subjects. Those, I was hoping, would allow them to reflect and experiment in their own time. Not ideal… I had to re-think the second session!


The second workshop went better. I briefly introduced slides, and let Ato Bereket, my fantastic and overly-qualified translator, to take it from there and explain concepts and ideas directly in Amharic. This allowed us to go through the material faster without compromising the discussion and content. We had more time to work on individual strategies, although another hour or two of collaborative work would have been wonderful!


All in all, this was a very successful educational day for everyone involved. After the presentations ended we got together, shared a buna (coffee) ceremony, exchanged thank yous, took a photo together, and started our weekend…


Upon reflection, I must say I am very impressed with the motivation these local teachers have to improve and enrich their understanding and practice as teachers. These workshops were not mandatory, they did not get paid for attending them, and many would think that they would not be very applicable to their situation. Yet they attended, participated, stayed to ask questions, and asked if they could come in the future and observe the classroom or create some sort of a collaborative practice with us teachers.

What an inspirational day. I hope I will continue to be involved in this collaboration and be able to see how these teachers grow in their profession, and how I grow as a result of these experiences.