Showing posts with label Google. Show all posts

Tuesday, November 6, 2018

Passion Projects: Design Your Own Version (After-Thoughts)

I wrote two blog entries about passion projects and how to set it up with students. You can find the posts here (part one) and here (part two). Now it's time to reflect so that the next iteration of passion projects would be more successful.

There is no doubt that learning about, and walking with my students through their first experiences in a more personalized learning setting has been quite demanding but even more rewarding. In order for students to properly 'learn how to learn' and to become the drivers of their educational vehicle, many things must be planned and taught. Here are 4 lessons I've learned from my own experiences:

Go Slow to Go Fast

I can't emphasize enough the importance of properly planning the experience. In previous posts, I wrote with great detail what I did to prepare for this great personalized learning experience. Try to think of everything you can- from tuning into or uncovering students' passions, to guiding them through the research projects, through getting outside experts, to your role and assessments. The more ready you are, the more flexible you will be able to be!

Student Agency

It was quite incredible to see the kids tuning into themselves and taking ownership of their learning. When you let go of expecting one particular outcome, the learners fill in the "holes" with their own interests, and guiding their learning according to their interests, passions, abilities and personalities. Let them be the drivers and you take the role of a researcher- taking note of how each progresses in his/her own pace, how slowly they become better agents of their own learning.  

Fail Forward 


When learners don't get to have a say in their own learning journey, they become detached from their own selves, and this is what the school experience become for them. Once you transfer the steering wheel to them, encouraging them to have a voice and to exercise choice, they inevitably become better and better at identifying their passions and at achieving their goals. When students spend enough time researching something they are not passionate about, they become less and less engaged in it. Talk to them about it, make sure they themselves notice it and act upon it. Let them struggle a bit, and then let them move on to something they are (more) passionate about. Make sure to emphasize the benefits of this learning, and celebrate it! Reflection is extremely necessary and is an excellent tool that would allow them to move forward.


Notice the Learning


As teachers, we sometimes choose to focus on what did not go well. That's OK, as long as you also take the time to reflect on the great things that happen. Students learn so much more than mere facts about their chosen topic/issue. They improve their research skills, their knowledge of issues, make connections to other areas, learn from each other, take risks, and most importantly, they learn about who they are both as learners and humans. The learning experience is absolutely worth it!


Equipped with these new learning, I look forward to designing new experiences to take my students forward.


How about you? What have you learned from designing passion projects for your students? Please share your experiences or questions!




Saturday, October 21, 2017

14 Chrome Extensions to Support Students with Learning Challenges

Blog- Learning Challenge Chrome Extenstions.jpg

What is “Assistive Technology”?

I vividly remember being back in Elementary school, sitting at my desk during a writing assignment, and complaining that my hand was too tired of writing so much. I also remember that two of my classmates had serious learning challenges. One was mostly deaf and the other had a physical deformity, which caused her serious fine and gross motor problems. Both of them had few opportunities to gain meaningful access to the curriculum, let alone an “equal” access. That was in the mid-1980s. almost 30 years have passed, and the picture has dramatically changed. The development of computer-based technologies has allowed people with disabilities to gain access to more information, to manipulate objects and tools, and to express themselves in ways other people can understand, relate to, and appreciate. Such technology is called “Assistive Technology”.
The term “Assistive Technologies” is defined by the American Assistive Technology Act of 1998 as, “Any item, piece of equipment, or product system, whether acquired commercially off the shelf, modified, or customized, that is used to increase, maintain, or improve functional capabilities of individuals with disabilities.”
There are many types and degrees of “disabilities”, and designers of Assistive Technology have been creating more and more tools as solutions for the myriad of ways individuals struggle. The PBS Parents website separates these devices into 8 categories: Access and Environmental Control, Aids to Daily Living, Assistive Listening, Augmentative/ Alternative Communication, Computer-Based Instruction, Mobility, Positioning, and Visual Aids.
A variety of software and hardware companies, such as Microsoft, Google, and Apple, as well as many smaller ones, have recognized the need to develop such tools, and have pledged a commitment to ensure easier access for their users. The Accessibility sections of their websites are easily accessible, organized, and simple to navigate. In addition, they ensure that many of the accessibility functions come built-in and easily accessible, so users are able to make use of such features without the need to purchase additional software.

Your Device’s Accessibility Features

Before you and your students look at hardware, software or add-ons to purchase and install, you must first get yourselves familiar with your device’s native, built-in features. The links below include links to resources for different devices and platforms. They include excellent tools to support users with a variety of challenges, so spend time on these websites before going on.
2017-10-21_09-30-44 (1)

Accessibility Tools: Google Chrome Extensions

Google’s commitment to supporting users with a variety of different needs is illustrated by the numerous accessibility features their devices offer. In addition, Google’s Chrome Store has additional third-party extensions that make devices and the Internet more friendly and accessible to their users.
Below I outline 14 excellent Chrome Extensions that make computer use an easier and a more pleasant experience- not only for those with severe challenges, but also for anyone who needs simple modifications and some assistance when working on their devices.

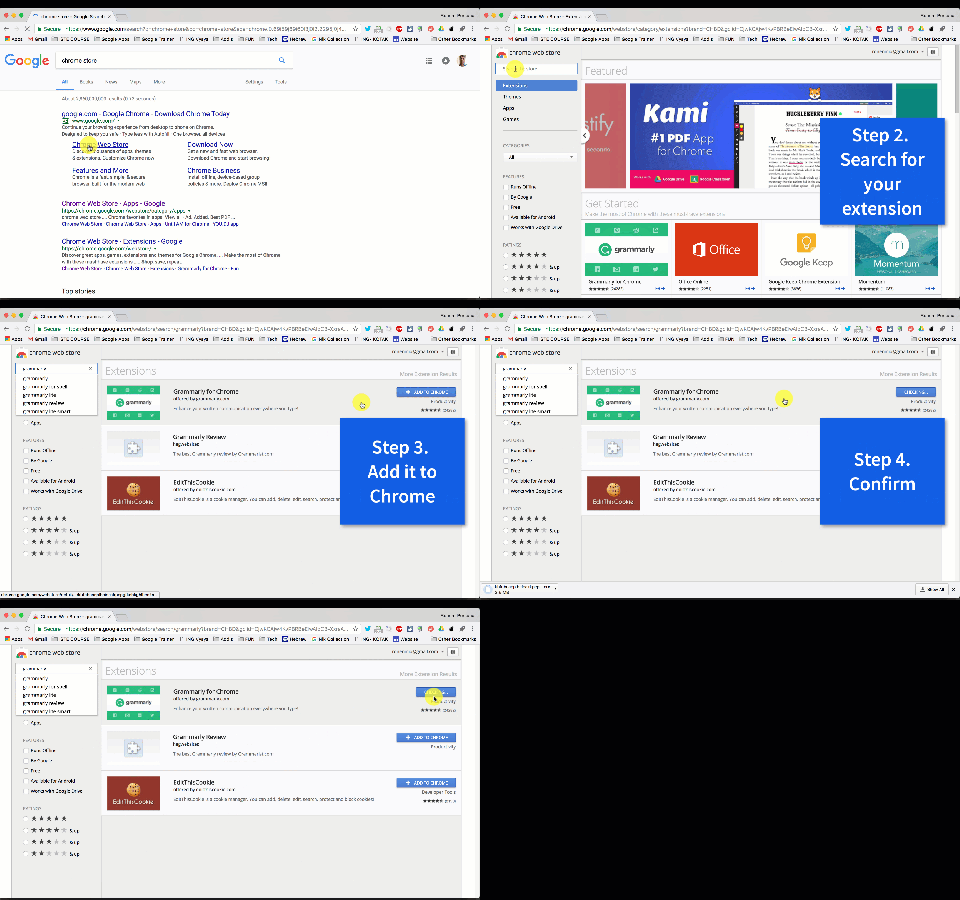
How to add a Chrome ExtensionGIF- Chrome Extension


14 Chrome Extensions for different learning needs

human-eye-clip-art-1384151134  Visual Difficulties

Vision is an extremely helpful Chrome extension that lets users choose a particular color scheme they feel comfortable with, and then adjusts every Chrome page’s colors to fit that scheme.
***Note: This extension changes the settings on your device. If you choose to delete it, first make sure you reset the colors to their original scheme.
NoSquint Plus allows users to set and remember site-specific color schemes and zoom levels so that they can read in a more convenient and personalized way. You can easily set zoom levels, background and foreground colors.
YouTube Colors Filters is a simple Chrome extension that lets you adjust many different visual aspects (brightness, contrast, saturation, and more) in every YouTube video you watch.
Screen Shader – F.lux for Chrome is a popular Chrome extension (works offline as well!) that allows users to change the color of their screen to match the time of day. It also gets rid of the screen’s automatic white and blue light that can cause eye irritation.
Select and Speak is a text-to-speech Extension. All users need to do is highlight the text they would like to be read aloud, and they’re done. This extension has a more natural human voice (male or female), and users can choose voice and speed options as well as select from several different languages.
OpenDyslexic is an excellent extension designed for dyslexic users. It changes all font on the page into a more easily readable font.
Snap&Read Universal is another text-to-speech extension, but with an added twist. Highlight text you want to be read to you (including text within images, which other tools have difficulty reading), and it will both read it to you AND highlight each word as it is read. Brilliant!

ear-svg_0  Hearing Difficulties

Substital is a Chrome Extension that automatically adds subtitles and closed captions to online videos on a variety of video content providers (YouTube, Netflix, Amazon Prime Video, and more). It allows users to synchronize the captions with the audio and adjust font size (and other features). You can also add your own subtitle files or search for existing ones in-app. Works with some success, but better than other similar services.

  Physical Difficulties

For fine motor (finger manipulation) difficulties, the device’s native speech-to-text features can be of great assistance. Here are two Chrome extensions that can help with fine motor obstacles:
Dictanote is a note-taking extension. You can quickly switch between using your fingers and your voice to type. It has a built-in word processor, and you can download your notes. The paid version allows you to organize your notes into notebooks and save them in the cloud.
Vimium can help users who have difficulties operating the computer’s mouse. The use of the mouse is replaced by a variety of keyboard shortcuts.

target-icon   Attention/Focusing Difficulties

Simple Blocker can keep users more focused for longer periods of time. You can quickly block an unlimited number of entire websites, sub-domains, or particular web pages. You can also set a blocking timer to reward yourself after a focused period of time. Password protected.
Boom- Declutter Pages, Improve Readability allows you to select anything you see on your page and make it disappear in one simple click. Quite amazing, actually! It also allows you to read content without signing into websites (like Pinterest), delete advertisements, and more! (a personal favorite!)
Rocket Readability is a simple extension that gets rid of unnecessary clutter- an entire web page turns into a text-only page with only the article to read. No images, no videos, just words.
Mercury Reader is another extension that makes it easier for users to have a less distracting working environment. Its features include ways to remove ads, comments, and noises; adjust typeface and text size, and change between dark and light themes.


I hope you find these Chrome Extensions useful and helpful. If you have any questions or know about other favorite and helpful Extensions, please share them in the comment section below.

Monday, September 25, 2017

Google Forms: Creating a Scavenger Hunt

Google Forms Scavenger Hunt

Over the summer, my son and I tried to find some interesting things to do around the city. After a short research, I found a company offering some exciting scavenger hunts around the country. There was a phone number to call and schedule the hunt, which I excitedly started dialing. The “tour operator” said that the tour is usually for groups of 8-14 members, and it costs the equivalent of $400. Shocked, I thanked the lady and hung up the phone.
When I told my son about the call, he was quite disappointed. After all, this was the only exciting-sounding activity I suggested to him. With a Maker attitude, I asked him if he would like to create our own scavenger hunt. “Let’s go to the Mall, find interesting shops, snap some shots, and create a scavenger hunt for your little cousins”. I was delighted to see his face glowing again, and within five minutes we were ready to go! Mobile phone and a clipboard in hand, we drove to the mall.
Why are these scavenger hunts so expensive? Aside for the fact that they were created by for-profits, I am not sure. I don’t really care, either, because I found an exciting and satisfying way to create my own, using Google Forms!

How to Create a Scavenger Hunt Using Google Forms?

When creating scavenger hunts in Google Forms, you need to be familiar with a couple of features:
  • Media Use: You will need to insert a variety of media (images, videos, etc.) which would serve as the hunting grounds (where the clues are hidden)
  • Sections: All questions are entered within the Form’s Sections. All questions entered in one section are viewable at once, which questions entered in the following sections are locked until the hunter correctly answers all questions in the previous section.
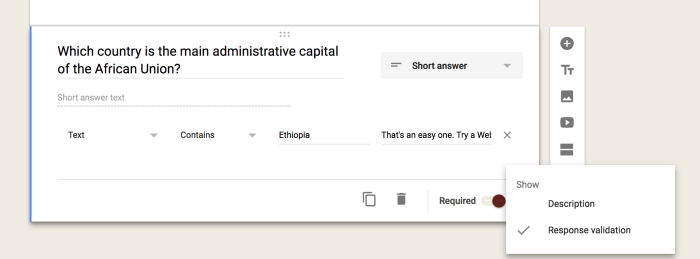
  • Response Validation: This option (the 3 vertical dots at the bottom of questions) allows you to set one correct answer, which, until it is entered in the correct spelling/ format, the answer is marked as “incorrect” hence hunters will be unable to move on to the next section until all questions are answered correctly. You can use answers in the format of numbers, dates, letters, etc.

Once you familiarize yourself with the above elements, you are ready to start creating your scavenger hunt.

Example Scavenger Hunt: Around the World

I created an example for a scavenger hunt (you can copy it here) which you can follow step-by-step to understand how to create your own. Before we start, make sure every question is marked as “Required”, so that hunters cannot just move on to the next section without first entering a correct answer.
  1. Create a title and a description. An image is optional.
  2. If you would like to separate this part from the first round of questions, create a question (such as, “Are you ready to start?”), which will take the hunter to the next section.
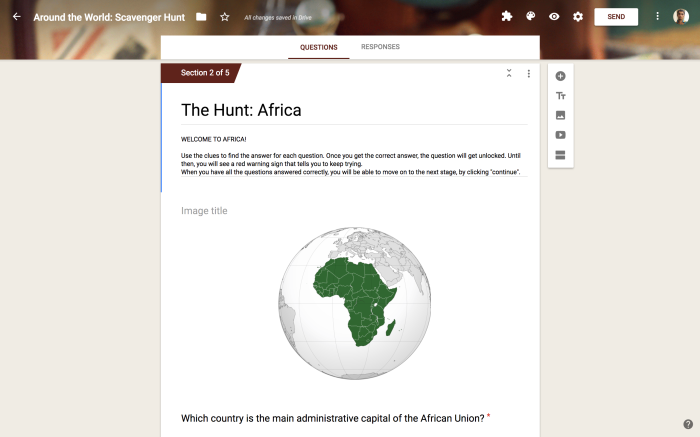
  3. If you chose to separate the introduction from the first batch of questions, create a new section and name it (I named it “The Hunt: Africa”).
  4. Go back to your section one question and click “Go to section based on answer”, to ensure the hunters are directed to the next section (the first question section)
Screen Shot 2017-09-25 at 8.07.16 PM

6. In the new section’s description, explain what the hunter will be looking for in this section.
Screen Shot 2017-09-25 at 9.08.57 PM.png
7. Enter a question. The answer to my question is “Ethiopia”, so in the Response Validation (make sure the question type is “Short Answer”), I entered Text, Contains, and the answer. As the validation clue (what will appear until the hunter entered the correct answer), I entered an encouraging clue.
Screen Shot 2017-09-25 at 8.18.11 PM
8. I created another question. This time, the hunter will need to watch a video in order to find the correct answer. I made sure to add a description that would guide hunters to use the correct format (not to write “Hospital” with a capital H, because Response Validation is case sensitive, so it will mark it wrong…)
Screen Shot 2017-09-25 at 8.28.55 PM
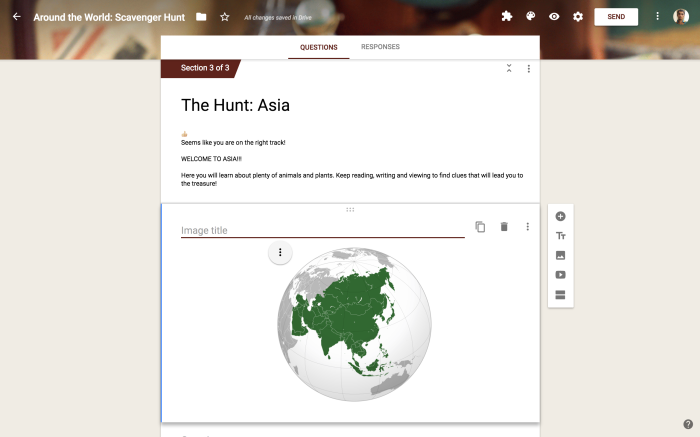
9. Once the hunter has answered both questions correctly, s/he will be able to move on to the next section. The next section is called “The Hunt: Asia”
Screen Shot 2017-09-25 at 8.32.09 PM
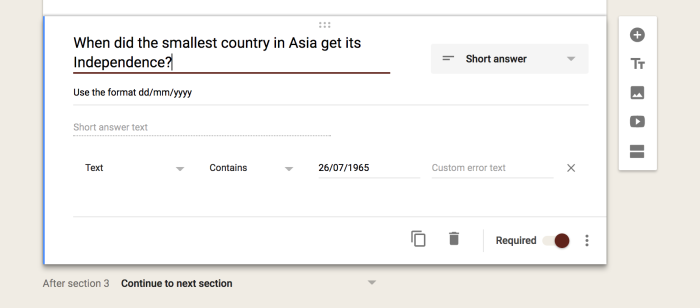
10. For this question I decided to add a date as the answer, so I made sure to write the correct format in the question’s Description.
Screen Shot 2017-09-25 at 8.51.55 PM
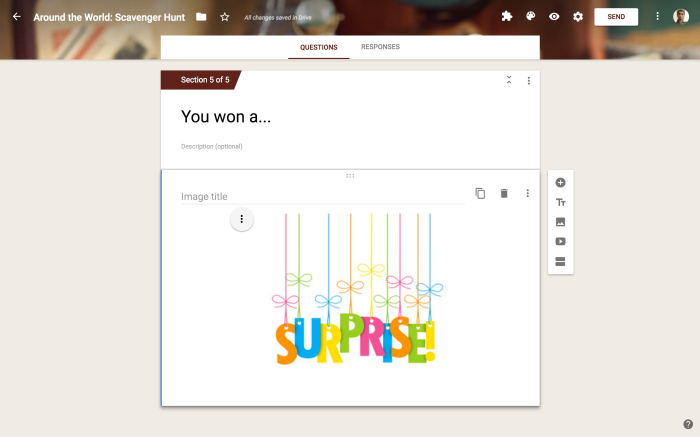
11. Finally, when the scavenger hunt’s questions have all been answered correctly, I created a final section that tells the hunters what they won. Once they are done, they can submit the Hunt and receive their reward.
Screen Shot 2017-09-25 at 8.51.33 PM

Book Project Scavenger Hunt

Another examples I created was a digitized version of my colleague Jill Fenn’s book project example. She created a traditional scavenger hunt for the excellent book Freak the Mighty by Rodman Philbrick. For this hunt (click to make a copy), students were to follow the clues from the book to different locations around the school. All I did was to go to these locations, and find permanent markers (the hunt’s longevity is important) to be used as unlocking clues.
Screen Shot 2017-10-05 at 3.51.55 PM     Screen Shot 2017-10-05 at 3.52.50 PM
If you would like to try the hunt, here are the answers to the questions (1. ICS; 2. twelve; 3. MS FIC PHI; 4. COMPANY; 5. 21; 6. HEALTH OFFICE; 7. eleven; 8. M-105). You can easily adjust the hunt to locations around your school.
And that’s it!
I hope this was an easy enough of a tutorial. If you have any questions, please let me know. And if you created a scavenger hunt of your own, please share the URL in the comments, or on Twitter!
Enjoy!!!

Friday, September 15, 2017

5 Awesome Google Forms Add-Ons

Blog- Forms Extensions.jpg
Google Forms is a powerful tool on its own, but you can super-charge it with add-ons. Add-ons are third-party tools that allow users to modify or enhance existing Google Forms (and Sheets) functionalities. Each add-on, which you get from the Chrome Web Store, usually “specializes” in one area, allowing you to tailor your Form or your Sheet to your own needs.

Let’s have a look at 5 of my favorite Google Forms add-ons:

Form Notifications:Screen Shot 2017-09-13 at 10.07.01 PM

Form Notifications allows you to send email notifications automatically, once the form has been submitted. Emails can be sent to the form creator, the respondent, or to both.
Uses:
  • Send a thank you e-mail with additional information to students’ parents who signed up for a particular meeting time with you.
  • Receive an e-mail after 5 parents filled out the form (the default is after 10 responses).

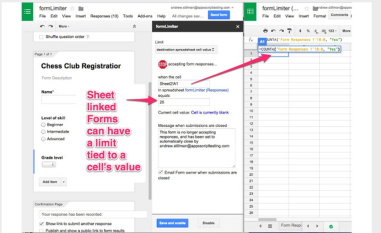
FormLimiterScreen Shot 2017-09-13 at 10.06.21 PM

FormLimiter is a great add-on to use when you would like to stop accepting responses automatically, at a certain point. For example, you can set a limit to the number of responses, at a certain date/time, or when a spreadsheet cell equals a certain value.
Uses:
  • Number- A registration form with limited number of available spaces.
  • Date/Time- Setting a deadline for a Google Form assignment.
  • Cell=value- Looking for volunteers’ help. Once a respondent selects “Yes”, the form shuts off.

Form Publisher (and their video): Screen Shot 2017-09-13 at 10.07.37 PM

This is a fantastic add-on that takes your Form submissions and displays them in a variety of formats (Google Docs, Sheets, Slides or as a PDF document). Although this requires a bit of preparation ahead of time, once you customized the destination document’s look, the rest is done automatically. Basically, each Form question has markers (that looks something like this: << the question >>). You then move those around in the document based on your needs, and then, once responses are submitted, each response is automatically pasted between the <<  >> symbols.
Here is an example of a Form I created for my students’ end-of-unit self-reflection. Using the Form Publisher add-on, I customized the destination file (I chose Google Doc). Then, once students submitted their Form (reflection), it used the template to create individual documents, that include their unique responses. All files were automatically organized inside a neat folder. Incredible, ah?
Uses:
  • Reflections
  • Assessments
  • Invoice receipts

FormRecycler (and their tutorial): Screen Shot 2017-09-13 at 10.09.17 PM

Have you ever needed to copy questions from one Form to another? And was unsuccessful? Well, FormRecycler allows you to do just that!
All you have to do is get into the Form you are working on, activate the FormRecycler add-on, choose the Form you’d like to “import” questions from, and you’re done!
Uses:
  • Combining assessment questions from several different Forms
  • Updating last year’s parent questionnaire

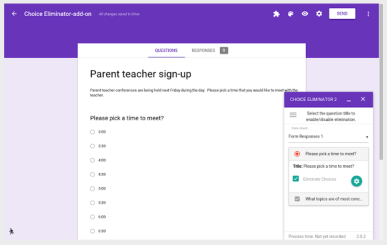
Choice Eliminator 2:Screen Shot 2017-09-13 at 10.15.12 PM

This fantastic add-on eliminates (deletes) options (“answers”) from your questions after they have been selected by a previous respondent. It works with multiple-choice, dropdown, or checkbox questions.
Uses:
  • Selecting time slots for parent conferences
  • Creating an inventory of class items
  • Students choosing groups/ jobs/ topics


And… a bonus (paid) add-on for all your mathematical needs:


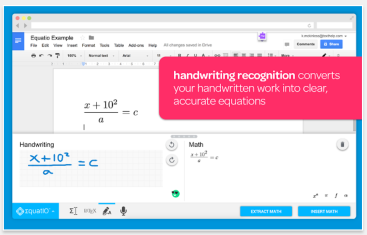
EquatIO (30 days free trial) Screen Shot 2017-09-13 at 10.12.01 PM

Ever tried to use Forms for Math assessment? What would the fraction “thirteenth” look like? How about a square root? Yes, a disaster! With EquatIO, you can create complicated mathematical equations and formulas by typing or handwriting them on the screen. It’s that simple!


I hope these add-ons help you become more creative and productive!
If you liked what you saw, gimme a holler either here or on Twitter!