Friday, September 1, 2017

Twitter: Getting Started


Twitter continues to make waves in different industries, and is up there with (or should I say “behind”?!) Facebook in serving as an incredible tool for finding and sharing information, and staying in touch with people.
Before I begin explaining how to set up and get going with Twitter, there are some basic questions to ask- the What and the Why…

What is twitter?

Twitter is a free social networking service (can be called “Microblogging”) where users can read and post private and public messages (called “tweets”). Tweets are limited to 280 characters (in addition to attached media like images, GIFs or videos).
Let’s look at some important features and vocabulary in Twitter:
  • The Feed/ Stream- once you follow users or post tweets, those tweets are organized on your feed (similar to Facebook, with the newest one at the top).
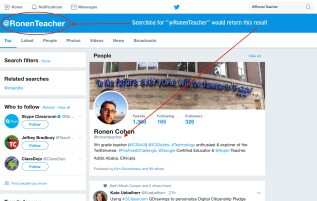
  • Specialized Symbols- Searching and tagging keywords or other users can be done through the use of the “hashtag” (#) or the “handle” (@).
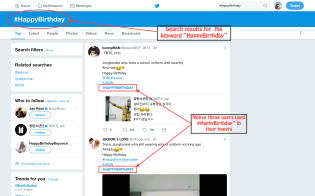
  • The Hashtag (#)- Placed directly before a keyword (i.e., #HappyBirthday), the hashtag allows users to organize content by displaying all the search results users tagged with the keyword (using the hashtag). So if users search for #HappyBirthday, ALL tweets (yes, this is a public platform) users inputted “#HappyBirthday” would be displayed.
  • The Twitter Handle (@)- Placed directly before an existing user’s name (i.e., @EduRonen), the @ allows to search for or tag particular users. If you search for “@EduRonen”, your results will display the user (@ EduRonen)’s feed (since this is, again, a public forum…)
  • Private messages- Users can send and receive private messages. Those messages DO NOT appear on your stream (hence Private…). This is the only way to use Twitter and not have the rest of the world be able to see it. But remember, ALL your non-private messages are for the world to see!
Screen Shot 2017-09-01 at 9.07.09 AM    Screen Shot 2017-09-01 at 9.01.37 AM

Why Twitter?

There are several reasons people use Twitter to share and find content:
  • News and instant updates- Following a particular newspaper, organizations, etc. would allow users to receive news from that user right when they are posted. For example, if you follow the user @BBCBreaking, your feed would display ALL tweets (and tags) by the BBC Breaking News user, thus keeping users informed at a “real time”.
  • Keeping in touch- Most users use Twitter as a way to keep in touch with family and friends. They subscribe to (“follow”) each other, and receive images, videos, news, etc. posted by those users.
  • Professional Networking- Many users use Twitter to either keep abreast news about their field(s) of interest, their work, or to share their work with others. Many educational institutions around the world now encourage educators to make use of this service in order to advertise the great things done in their classrooms, at school, to keep parents informed. Private entrepreneurs, writers, and other professionals, use Twitter to share their work, advertise their services (by following [sometimes random] users), hoping they would follow them back and stay informed of their work.
So… If you think Twitter is for you, read on!
Once you decide you are interested in being a part of Twitter, it is important to think about your goals for using it. Is it for personal use? For work? Both? It is important to decide that now because this would determine which users you would follow, who would be interested in following you, what content you would be posting, which e-mail address you would use (I use my school’s e-mail address, since I use Twitter mostly for professional learning and sharing).
Now that you have a purpose, you are ready to create your very first Twitter account (Hurray!)

Creating an account
Screen Shot 2017-09-01 at 9.30.22 AM.png
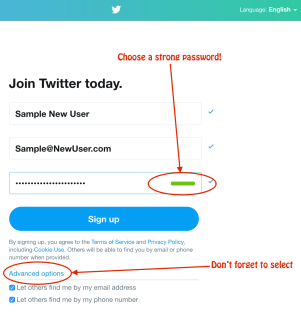
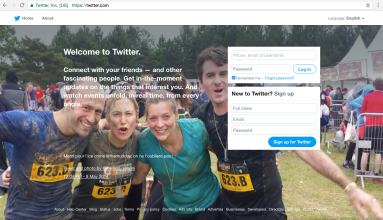
Creating an account if very simple. Go to Twitter.com and follow the steps to sign up. Choose a username and password, and enter your existing e-mail address.
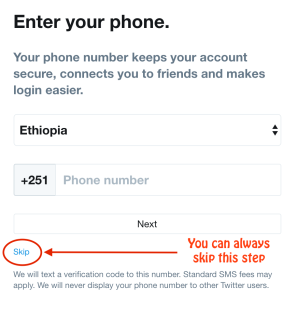
Follow the instructions on the screenshots below, or read the notes if you are not sure what to do in any of the steps:
  • Entering your Full Name: This is the space to enter your “real name”.Screen Shot 2017-09-01 at 9.50.45 AM
  • Entering your e-mail address: Remember- is it a professional or a personal account? Where would you like to receive notifications and maintain your account? This can be changed later.
  • Entering a Password: Choose a long and safe password. The green stripe indicates how likely it is that your password would be difficult to hack (no password is completely safe these days…)
  • Notifications: Choose if you would like to receive phone and/or e-mail notifications (the default is both…). If you are using a mobile device, a Notification message would pop-up. If you enable notifications, your phone would send you notifications when someone tags you in a post (using the @ symbol), when someone replies or retweets a tweet you were mentioned in, or if someone sent you a private message. Is it for you? Either way, remember you can change this in your phone’s Notifications settings and under the Setting menu options in Twitter later on.Screen Shot 2017-09-01 at 9.57.41 AM
  • Screen Shot 2017-09-01 at 9.58.45 AMChoosing a Username:Make sure you choose a relatively short name, since in most cases it will be a part of the allotted 140 characters for each tweet. Choosing the username @TheBestBusinessManEver would mean users who wish to tag you now have less than 120 characters left for their message… Choose a username that reflects the reason you chose to use Twitter- for professional use? For personal use? Check if you could use your first name, last name (or both) as your username, or insert something that hints about your profession (something like @ EduRonen, @RonenCohen, @RonCohEd, @RonenTeacher, etc.)
  • Not Choosing a Username: You can skip choosing a username, and Twitter will assign you one. You can change that username later on.

Finding Users to Follow:

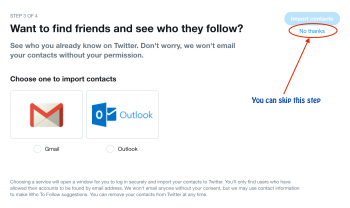
In the process of creating your account, Twitter will be suggesting a variety of people for you to follow. You can always skip these steps.
  • First (Step 2 of 4), Twitter will ask you to choose topics you are interested in, so it can suggest users to follow based on that interest.
  • Second (Step 3 of 4), it will ask you if you would like to find users you already know based on your e-mail’s contact list.
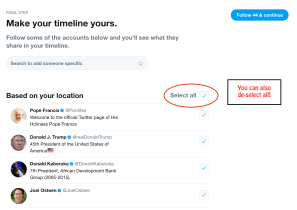
  • Finally (Step 4 of 4), it will suggest users based on your location. Here you can choose if and who you would be following.
Screen Shot 2017-09-01 at 9.59.20 AM.pngScreen Shot 2017-09-01 at 9.59.38 AM   Screen Shot 2017-09-01 at 10.00.04 AM
Once you are done choosing users to follow, you will get another notification message. This time, it is for your browser (Twitter notifications would pop up when you are using your browser and are online)…
Screen Shot 2017-09-01 at 10.00.22 AM
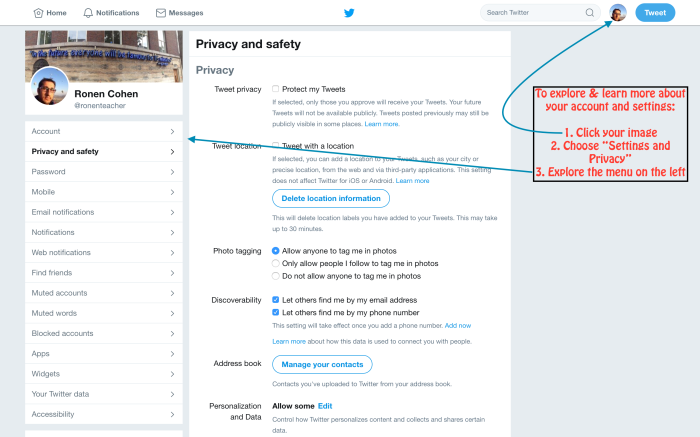
So now, you are technically ready to start tweeting, following, etc. I think this would be a good time to take a break and explore different areas in the Twitter user interface. Here are some suggestions:
  • Check different settings of your account and adjust them to fit your needs and wishes;
  • look at Twitter’s suggestions on the right and left of the feed area, etc.; and,
  • personalize the look of your account.
Screen Shot 2017-09-01 at 11.27.08 AM

Personalize Your Look

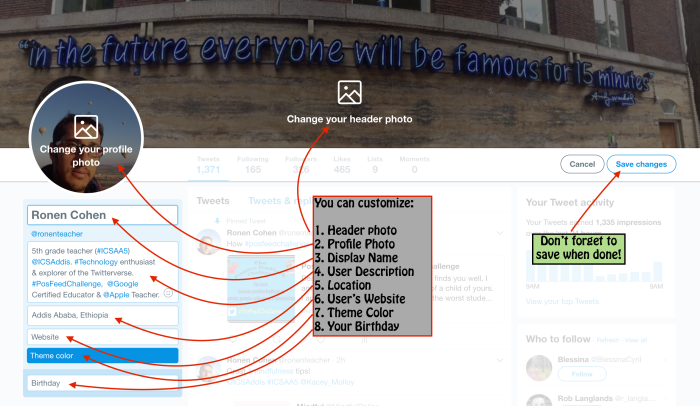
The look and feel of your user account can change based on your taste and needs (it is not only for you; it shows on everyone’s Twitter when you tweet, when they look at your profile, etc.). Let’s look at what can be customized:
  1. Header Photo
  2. Profile Photo
  3. Display Name (your real name, if you'd like)
  4. User Description
  5. Location
  6.  Your Website
  7. Theme Color
  8. Birthday
To get started, click on “Edit Profile”: Screen Shot 2017-09-01 at 11.27.46 AM

Then, start tailoring your Twitter look to your liking!
Screen Shot 2017-09-01 at 12.52.35 PM
*** If you are not sure about the user description part (#4), for now you can just write who you are and what you do. As you get more experience using Twitter, you’ll know exactly what to do.
Are you ready to connect? To find out? To share? To learn? Here we go…

Becoming a Twitter User:

Following users and keywords:

If you chose to look for users via your e-mail or phone contact lists, and selected topics and users of interest, you are already “on Twitter”! Let’s look for some more great users to follow! How do we do that?
  • At the right side of your screen, you will also have ideas for users to follow
  • Are there any colleagues you would like to follow? Do you have a friend who is very active and you know s/he has many Twitter “friends”? Go to their profile and find who they follow or who follows them
  • you can look for people, topics, and events using the “Search Twitter” box near your profile picture. Feel free to input words using the hashtag (#- for key words), the handle (@- for users), or without using these symbols. Start exploring and find people you find interesting or follow-worthy.
Screen Shot 2017-09-01 at 1.18.23 PM.png
Being an “active” Twitter user means you also contribute to the experience, not just follow people and read/view what they have to share. If you would like to get followers, you will need to put yourself out there- “re-tweet” and “like” other users’ tweets, and tweet what you have to tell the world (or your colleagues, strangers, or your friends…).
So the million dollar question- How do you get more followers? Well, unless you are a celebrity outside of Twitter, you’re gonna need to work for it. When you start sharing interesting and valuable information, people will start following you- in very much the same way you follow them.
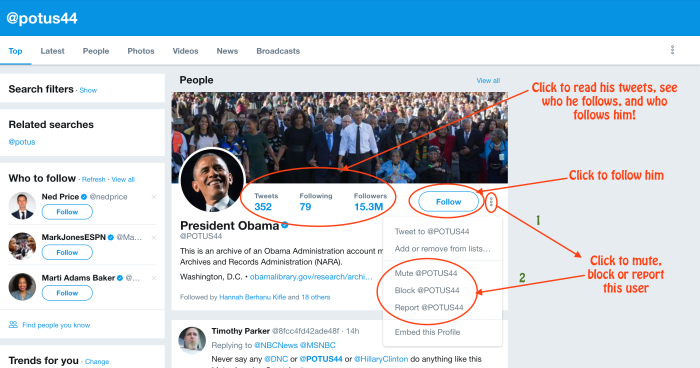
So before we get into the HOW of Twitter, let me just tell you that in the exact same way you can follow people, you can also “unfollow” them. All you need to do is to get to their profile (or hover over their name in any post) and click “Unfollow”. It’s that easy- you’ll stop receiving their tweets on your feed. Also, if you would like to block, mute (follow them but not see their posts), or report users, click on the 3 vertical dots (like in the screenshot above), and do it.
OK. Our last “beginner” topic is… Posting Tweets!

Posting Tweets, Re-Tweeting and Liking Tweets

What is a “”tweet”?

A tweet is a post. Simply said, it is you expressing yourself in 140 characters or less.

What’s In a Tweet:

In your tweet, most users use words to express themselves, but there are other options. In every tweet, you can:
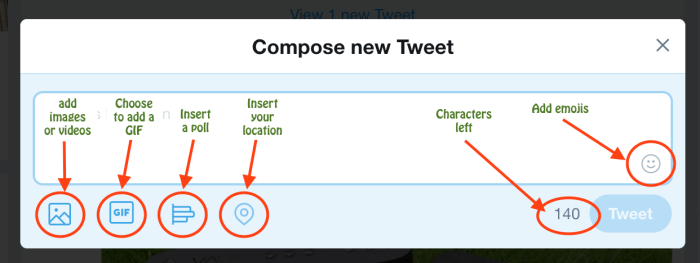
  • add images and/or videos (up to 4);
  • insert a GIF (which is basically a series of images stitched together, on a loop). The GIF option you get when you tweet would allow you to choose from a variety of pre-loaded GIFs;
  • create a poll (compose a question and add several possible answers for others to share their views);
  • Share your location;
  • add emojis (these can save valuable character spaces!);
  • insert links (those count as a uniformed 23 characters, and provide users a preview to the destination URL)
Screen Shot 2017-09-01 at 1.38.05 PM.png

Tweeting:

There are a few different ways to “tweet”- you can compose your own tweet, reply to a tweet, “like” a tweet, and you can “re-tweet it”. When you retweet a tweet, you have the option of simply retweeting it, or to add up to 140 characters as a response (you can always tag other users or keywords).
Screen Shot 2017-09-01 at 7.51.40 PM
Finally, let’s get ready to compose our own tweets. How do we do that exactly?
  • Being Economic: Now that we have 280 characters to express our thoughts, opinions and feelings (increased from 140 characters), you still sometimes need to consider the number of characters you use. The Twitter community has been using different ways to abbreviate or shorten words for that purpose. Consider what these mean: “gr8”, “u”, “2”, “FaTH”, “IMHO”, “WDYMBT” (OK. I had no idea what the last ones meant until I ran into this article…), so in times of need, be creative!
  • Tagging Users (@): There will be many occasions when you would like to let people know about a particular tweet you are about to share. For example, you found a great new article about Polar Bears, and would like your colleague Jack to know about it. All you would need to do (aside for knowing his Twitter handle/username) is to add @JackMyColleague (or whatever his real username is) anywhere in your tweet, and he will get notified right away. You could “tag” multiple users, given you still have room in your allotted 140 characters.
  • Tagging Keywords (#): There will also be times you would like to tweet about a particular keyword, so when others look for it, they can easily find it. Those keywords don’t belong to anyone, they are just a regular word you (and others) choose to turn into a keyword. For example, if you are tweeting about being extremely exhausted at work on a Friday afternoon, you could add the hashtag “#TGIF” anywhere in your tweet. This way, anyone who looks for posts with “#TGIF”, would find yours as one of them. Popular hashtags vary from place to place and across time, but they will always stay as keywords on Twitter.
This is seriously all you need to know in order to get started on Twitter. Like other areas of life, the more you use it, the more new things you learn!
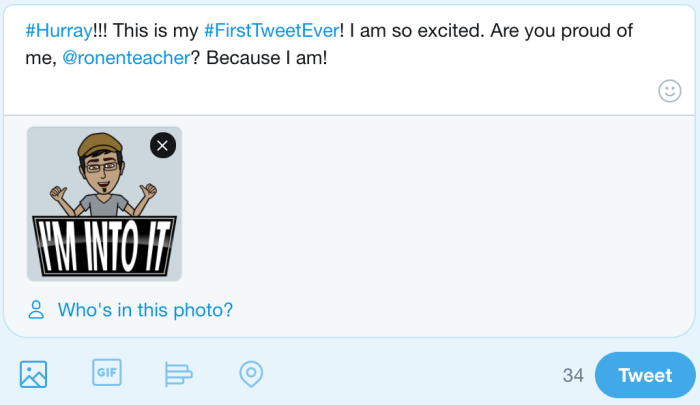
Lastly, if you read this tutorial, and you notice any inaccuracies or anything that is too difficult to understand or missing, please let me know. And… if this post got you started on Twitter, please tag me (@EduRonen) in one of your posts so I can celebrate with you!
Enjoy the ride!!!


Screen Shot 2017-09-01 at 8.06.13 PM.png

Friday, August 25, 2017

Positive Feedback and the #PosFeedChallenge

Dear (Failed) Parent,
I hope this e-mail finds you well. I am e-mailing you about that monster of a child of yours. I am quite confident to say that she is the worst student I have ever had, and that going to school seems quite a waste of time for her (and everyone else), as nothing will ever become of her. Your daughter’s other teachers and peers all share this sentiment. I encourage you to take more frequent and longer family vacations during the school year, or even better, to take her out of our school.
Have a wonderful day,
Your Monster’s Teacher
Even though some of us educators may have, at one point in our careers, had the urge to send the kind of message above to parents (and I hope none of us did…), I am sure the reasons this e-mail is inappropriate are quite obvious- It is disrespectful and reactionary, it is too general and does not provide any specificfeedback about the child’s behavior, it does not suggest any prior intervention steps that were taken, and does not offer any realistic and positive suggestions as to how existing issues can be dealt with.
Sharing with parents negative feedback about our students seems to be the more common type of day-to-day communication we have with them. Although the intentions may be positive (such as to inform parents of certain unacceptable behaviors), or we may even be required to send certain e-mails, in order to properly do our job and serve our students in the best possible way we can, we must consider the short- and long-term implications of such communication. Parent e-mails affect:
  • Our relationships with students and their parents
  • The ultimate goals of creating a positive classroom culture and encouraging students to become kind, thoughtful and empathetic students with healthy problem-solving skills.
When it comes to sharing positive feedback with parents, it seems that communication is far less frequent. At the end of the last academic year I asked tweeting educators to share information about the frequency and nature of parent feedback they provide about their students. Some important findings were:
  • Educators believed that sharing positive feedback is more important than sharing negative feedback with parents, and even more than if the nature is informational;
  • The most frequent teacher-parent communication topic was informative (neither positive nor negative);
  • Negative-natured feedback was more frequent than positive one; and,
  • Most educators wished they contacted parents more frequently to share positive feedback (which was the exact opposite with providing negative feedback!)
The above findings are a bit confusing, as we see an inverse correlation between educators’ beliefs and desires and the actual feedback given- if positive feedback takes the highest precedence, how come it is the least common type of feedback we are providing? And on the same token, if informational feedback takes is the lowest importance, why is it the most frequent one we send home?
In order to match our priorities with our actions, it is important that we acknowledge the importance of positive feedback about our students, and we ensure we take time to celebrate our students’ personalities, abilities, and choices.
This year, I decided to take on the challenge of doing just that- increasing positive feedback to my students’ parents. At the beginning of the year I plan on sending at least one email to parents every day, and after that send a positive e-mail to parents at least once per week.
I would like to ensure that the (positive, negative and informational) feedback I provide with them is useful, and so I will make sure to keep the following points in mind:
  • Timing: My eMails will address behaviors/ events in a timely Manner, preferably before the following day.
  • Ownership: I will remind parents that we are all a part of the same team, and the student’s successes (as well as difficulties) are a result of our choices and hard work.
  • Specificity: My messages will pinpoint one or two specific behaviors I would like to celebrate (academic performance? Social development?) and will include specific examples.
  • Next Steps: I will make sure to look forward and include next steps or possible ideas/ solutions to prevent from (or encourage) the event to occur in the future.
I hope this would make a difference not only at school, but also in students’ homes and in their choices and realities in the future.
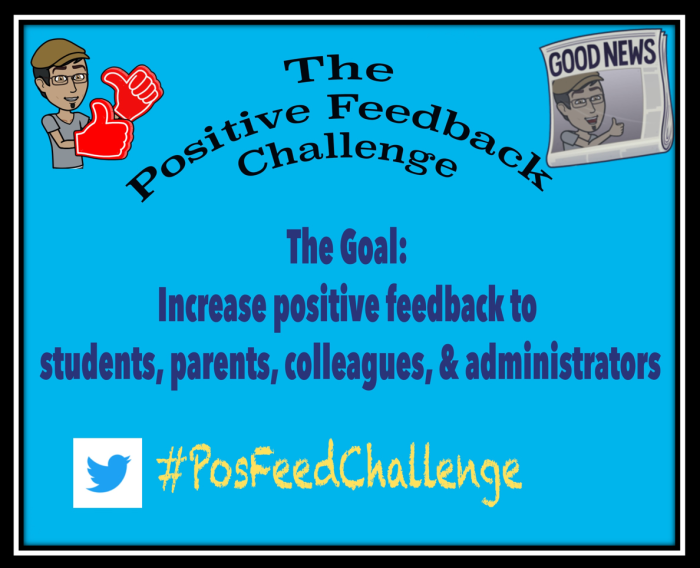
#PosFeedChallenge
I would also like to take this opportunity and encourage you to join this challenge, and provide more positive feedback about your students, colleagues, administrators, and even your friends outside your workplace.
If you would like to contribute or get ideas for positive feedback, please visit this Google Form (to share some of your ideas), or go directly to this Google Sheet (to find ideas for positive feedback to others). Finally, please visit #PosFeedChallenge on Twitter and take part in sharing and celebrating a more positive new school year.
Thank you for making a difference.

Sunday, August 6, 2017

Talking Tech: The New 2016 ISTE Standards for Students: Innovative Designer

ISTE Standards- 4-Innovative Designer
In this blog post, I discuss and provide tools and ideas for classroom implementation of the fourth 2016 ISTE Standard for Students, “Innovative Designer”. If you would like to read the blog posts for the first three standards, you can find them are:
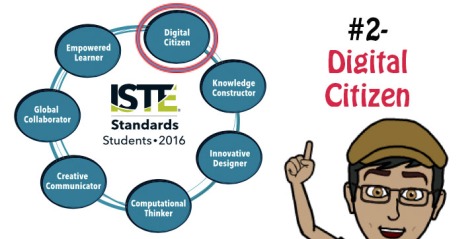
ISTE Standards- 1- Empowered LearnerISTE Standards- 2- Digital CitizenISTE Standards- 3-Knowledge Constructor.jpg


For more background information about the new standards, read my blog post “Talking Tech: The New 2016 ISTE Standards for Students (1 of 8)”.
ISTE and its contributors have been publishing excellent documents that explain and support educators in the adoption and practice of these standards. Here are a few of them:
  • I recommend following ISTE on Twitter. By checking their feed you can find lots of great articles about the different standards.
  • ISTE Standards– This is a link to all ISTE Standards (for students, teachers, administrators, coaches, and computer science educators)
  • The ISTE Standards Community– Check out this living and breathing online community for discussions, announcements, community blogs, and much more!
  • ISTE Standards for Students- eBook– ($10)- This eBook contains explanations, examples, suggested skills for implementation in different levels, a comparison to the 2007 Standards, a suggested Scope and Sequence, and more!


Standard 4: Innovative Designer

Students use a variety of technologies within a design process to identify and solve problems by creating new, useful or imaginative solutions.

Former US President Barack Obama saw the need to emphasize ingenuity and design in US schools, and in the second term of his presidency he created the first White House Maker Faire (called “Nation of Makers”) in order to encourage educators and students to create and innovate. This is exactly what this standard is about, and the key to its successful implementation is the use of a design thinking process as a tool to designing creative solutions to complex existing problems. It is the process through which a problem is identified, an idea (or ideas) for a product/solution is suggested, planned, tested, and revised (again and again) until it becomes viable to be implemented and used.
(The stereotypical design thinking process includes the above five steps)
Let us examine some of the tools and resources that would allow us to guide our students not only in the process of making and innovating, but in instilling a new mindset and approach to problem solving:

What is Design Thinking?

It is important that educators, at any given school, work together to adopt a common process. Although the idea of the design thinking process is relatively consistent across different models, one must remember that it originates from a more professional organizational setting, not from schools. Here are a few resources that would help educators and students to understand what the design thinking process is, and choose a model that best fits their setting:
  • Videos- What is Design Thinking?
    • In this video, Daylight explains what Design Thinking is and how they followed the five steps to successfully get American children to get more exercise.
    • John Spencer and A.J. Juliani designed a student-friendly process called LAUNCH (more information below). This video explains their innovative process and how it works.
    • TEDx (13:44 minutes)- Five great rules for teaching Design Thinking that would allow educators to reach all students.
    • A great video playlist to explain what Design Thinking is and how it is implemented in different schools. (and here is a TED search for great Design Thinking videos, blog posts, and more)

Design Thinking Toolkits and Tools:

  • IDEO and Riverdale County School’s free Design Thinking Toolkit for Educators is an excellent comprehensive guide for using the process in the classroom. Check out the website, get the toolkit, and get to work!
  • LAUNCH- Check out the website for some information about the student-friendly cycle, and find resources on how it is being used in classrooms. You can purchase the LAUNCH book or visit John Spencer’s or J. Juliani’s excellent blogs that focus on Design Thinking and innovation.
  • Innovation Flowchart (more complex)- The Innovation Flowchart gives a detailed overview of the various stages in an innovation process, listing the activities, requirements and goals of each stage. A very useful planning tool to bring ideas to life.

Ideas for Design Thinking projects and activities:

  • CityXProject– A project that uses 21st century skills, including emotional literacy, empathy, design thinking, creative problem solving, and social literacy using hands-on engagement with 3D printing (optional) and modeling technologies. You can get the toolkit to run your own workshop with your students.
  • KidsThinkDesign– A collaborative effort of professional designers and creative college students, this great website was designed for students, teachers and parents to learn about professions that deal with design (graphic design, fashion design, architecture, and more), and to practice some of the design thinking skills through a variety of projects, collaboration, meeting professionals, and more.
  • The Institute of Design at Stanford has a K-12 Wiki for design thinking projects and challenges, and has lots of resources to teach and practice design thinking.
The underline message of this standard is that students recognize the importance of the process of coming up with an idea and repeatedly refining it, until it becomes high quality. Whatever project your students engage in, they must go through the important stages in the design process, so that the product they create is well-thought-through, and is the best version of what they are capable of making.

Additional tools and resources for student-makers:

  • TinkerCad– A simple browser-based 3D design and modeling tool. Users can come up with any idea and quickly design, print and cut it. There are basic tutorial lessons, and advanced designers can find lessons on how to create artistic objects of increasing complexity by tinkering with existing designs, as well as to work collaboratively to create new designs.
  • Create How-To Guides are a great way for students to show their understanding and to ensure they include the correct and chronological steps when designing a product or explaining procedures. SnapGuide and Instructables are two great places for students to learn how to write instructions in an organized and inviting way, and to join large communities of makers and designers.
  • iBooks Author (iOS; Free)- This Apple-made authoring program allows users to create beautifully designed interactive books, manuals, etc., and publish them to the Apple iBooks Store (or export as PDF)
  • App Making- Tools for students to test, develop, and publish their own apps:
    • MIT’s AppInventor– Initially designed to introduce educators and students to coding, this relatively simple (MS and higher?) is a block-based programming for creating apps for Android OS. You build your app on a laptop/desktop (Apple works too), and test it on your Android phone.
    • Thunkable– A business idea that rose out of AppInventor, Thunkable uses similar but simpler drag-and-drop functionality. It is extremely simple and intuitive, and does not require any coding skills to create mobile apps.
    • Swift Playgrounds– This is a simple iPad app which would allow youngsters to learn the skills to create a real iOS app.
    • CommonSense has a good list of resources (with reviews) for different apps and programs to help students code on any platform.
  • Guest Speakers- There are many great professionals you could invite to your classroom to share and discuss how the design thinking process applies to their work- how they came up with ideas, how viable these ideas were, how they changed and morphed into the final product, etc. If you would like to put a touch of tech to your guest speakers, you can always use Skype in The Classroom to find guest speakers around the world who are willing to share their knowledge and experiences with students.

*** Looking for even more resources?

  • Here is InformED’s great list of 45 design thinking resources for educators.
  • The online site of the book Invent to Learn: Making, Tinkering and Engineering in the Classroom has some great resources– from starting a Maker’s Lab to how to use different materials, related organizations, cool projects and much much more!
  • You can find many great examples for projects and other resources on Pinterest.
  • The hard working folks at CommonSense have come up with a list of design thinking tools- from ideas to projects to apps- they got you covered!


Students as Innovative Designers. I hope this blog entry provides you with useful resources to use in your classroom or at home. As always, if you have any other ideas for good resources, any corrections for what I wrote, etc. please leave a comment below.
Next one up, ISTE 2016 Standard for Students #5, Computational Thinker!