Tuesday, May 1, 2018

Reflections On “The Best PD Ever!” Part 1- Design at ISB

In the course of this school year, I was fortunate to be introduced to the idea of Innovation in education (yes, I’m pretty late to join the wagon…). I initially was not sure what exactly it meant or looked like, but the more I looked into it by reading great literature, participating in Twitter conversations, and discussing with anyone I could find to engage with me about these topics, I realized that without it, schools and teachers are likely to lose their value and not actualize what their initial purpose has been- to prepare their student population to the challenges of the present and future, and to create responsible and contributing citizens, so that hopefully they’ll be able to fix all the problems our generation has left them with.

When the opportunity to explore other interesting teaching roles at the school arose, I was the first to apply for a new ES Design position as well as to a new Research and Development ("R&D") project my school chose to embark on. So, long story short, in the next two years I will be spending my days as a 50% ES Design teacher and 50% member of our new R&D team.

ES Design- Taking our grade 3-5 Visual Arts course one step further, and including more STEM opportunities to address both Visual and Media Arts elements as well as Science (Engineering and Technology) standards, all through integrated project-based learning that emphasizes the iterative design-thinking process. 
R&D Team- Composed of several tiers, with the one at the center including two educators from each division (ES, MS, and HS) and the Head of School, and reporting to our division’s Vice Principals, we were tasked with creating a 5-week personalized learning experience for our students (Kindergarten to grade 11). Everything involved in the reasoning, planning, preparing and executing this goal (all the WHYs and HOWs) is what we will be focusing on in the 2018-2019 academic school year.
When I was asked for what kind of Professional Learning opportunity I would like to do to support my understanding and growth in these distinct areas, and the idea of a school visit was suggested, I was ready to start planning my trip to China to visit some of the most dynamic and innovative schools who have been grappling with the same questions we are starting to for quite a while, and have taken steps to address these needs in creative and unique ways.

The three schools I chose to go and visit were the International School of Beijing (ISB), Western Academy of Beijing (WAB) and farther to the south, Nanjing International School (NIS)


The objectives of my trip were threefold:

  1. Learn what established ES Design and personalized learning programs look like 
  2. Get ideas for implementation in my school 
  3. Connect/ network with like-minded leaders in the industry
Together with two colleagues (teaching HS Social Studies and HS Science), we ventured to Beijing to start our incredibly rewarding learning journey…

In this blog entry series, I will re-capture my learning and reflect on the different programs we observed at each school, and add some of the important takeaways I got from each school and program. Here are the programs I looked at within each school:

ISB (International School of Beijing)
  • ES Design Course (K-5) 
  • MS Future’s Academy (grades 7-8) 
  • HS Future’s Academy (grades 9-10) 

WAB (Western Academy of Beijing)
  • Design and the PYP Exhibition 
  • FLoW (“Future Learning of WAB”) 

NIS (Nanjing International School)
  • ES Design 
  • MS Design 
  • MS “X-Block” 

*** Disclaimer: These five days of school visits have been extremely busy, interesting and intense few days, and I have no doubt I did not get the full picture of the history, present, and plans for the future of each of the programs I observed and conversed about. If you notice and inaccuracy, I apologize and would appreciate if you could contact me so that I can represent these hard-working educators and their work more accurately.


Days one and two: ISB- Design

The Design-Thinking Process at ISB:

As soon as you get into ISB it is clear that the school is taking their newly created Design-Thinking process quite seriously. Aside for the fact that posters of the process and other Design-related propaganda are spread around the school’s walls (in both classrooms and hallways), the conversations we had in the past two days included numerous mentions of the Design process and the importance of integrating it into different aspects of the curriculum- both vertically (ES, MS, and HS) and horizontally (across different subjects).

The ISB Design-Thinking process is quite basic. It was put together by a small committee with all three divisions in mind. This way, they believed, each division can, on the one hand, share the general process and vocabulary, and on the other hand, get into as much detail as they needed. I really liked that idea. Julie Lemley, one of the Design facilitators, shared that using this process has marked a powerful shift in their work to embed Design in teaching and learning.

ES Design at ISB:

While Design seems to flourish and is visible all around the Middle and High Schools, the idea of using a process in the Elementary School had only started in April 2017 when ES homeroom teachers were officially included in the final stages of the ideation and implementation of the ISB’s Design-Thinking process. Since then, the ES has adopted the ISB Design-Thinking process, but no requirements accompanied it. A few teachers chose to voluntarily use the ISB Design-Thinking cycle in part of some units of study.

Setting the Stage:

  • All ES teachers went through a “What is Design-Thinking?” hands-on training session. 
  • Two teachers were hired for full-time “STEAM Integration” positions (the K-2 facilitator moved from a third-grade homeroom, and the 3-5 facilitator was hired as tech-integration coach), while the ES Librarian has taken on EdTech, library, and Design for Pre-Kindergarten students. 
  • Beginning next year, the facilitators will be collaborating with homeroom teachers to integrate design-thinking into units rather than teach their own Specialist classes. They believe that Design Thinking (as well as technology) should be embedded in the curriculum, providing students (and teachers) opportunities to explore what it is, what it means, and what it looks like when working on projects. 
  • A basic Design Lab was allotted. It will be available to about 36 classes. Currently, teachers are aware of the need to expand and will be using other spaces (such as homerooms) for the theoretical stages and the lab for the “Making” parts. They are also aware that it may send the wrong message to students, as this space is not just a “place to build things”, which is only one part of the design process. 
  • Not having requirements allows the design team to focus on quality planning. They feel like they have the freedom to go slowly, plan and put systems in place.

The Curriculum:
  • ISB has created their own design standards for MS and HS. They are currently working on specific skills and are simplifying it for ES. 
  • Each element of the generic Design Process is divided further and explained in separate documents. 
  • Planning to break required skills by grade level: “By the end of… all students know how to use… (box cutters, glue guns, etc.)”

Teaching:
  • Students do research in the classroom so that they work on skill-building in the lab.
  • Breakdown of lessons: 
  • Introduce the Design Challenge 
  • Review expectations 
  • Give challenge 
  • Planning: Students write things down before they start creating 
  • Emphasis on understanding the importance of the process 
*** Time for feedback and critique (very important!)

Student Agency:
  • A big goal is to build capacity in the students so they are ready for MS Design. “We would like to start pushing up rather than trickling down” (Angela) 
  • Some students don’t know what they don’t know. Once they realize, there’s the desire to learn more. 
  • Students are happy to solve challenges and demonstrate their understanding and knowledge 
  • Agency in terms of “I know what I need and what tool I need to use”- is there. In terms of planning for a specific audience or independently following the Design Process- not yet 
  • Students are not used to being asked questions about their work, but they are getting used to being asked lots of questions about each part of their processes and products.
Sharing and Assessments:
  • Getting parents to understand how much fun it is to Make
  • Involving the parents by holding events and allowing parents participate in design challenges (for example, “Design a lunchbox”). Reflecting with parents about what they did, what they learned (skills as well), how is it useful in life, etc.
  • Great buy-in!

Still need to figure out:

  • Sometimes feeling like getting forced into projects 
  • Difficulties getting teachers to use design-thinking process and to take risks 
  • More documentation is needed (for example, for design-challenges) 
  • Collaborate with classroom teachers to articulate and include the Design Process in their units

Suggestions for Starting a New ES Design Course:

  • Start with less (both materials and space) 
  • Do a few things very well 
  • Pick one skill you can say “Every kid can”, then move on to another skill, and so on 
  • Build a good team around you 
  • Conduct a teacher Design-Thinking PD (at the beginning of the year?!) to make sure everyone understands what it is and speak the same language. It

Valuable Resources:

  • David Lee (DT in ES) 
  • Pinterest 
  • Destination Imagination’s Instant Challenges (adapted) 
  • Use badges for successfully participating in voluntary classes for teachers/students? 
  • Create teacher Expert groups? (with badges)

Takeaways:

  • Anchoring Design in the Visual Arts and enriching it with technology and the idea of Play is a unique way to introduce Design 
  • Grades 3-5 is an excellent age to start thinking deeply about Design Thinking 
  • We need to start talking about Design-Thinking more seriously as an Elementary School 
  • I need to collect Design Challenge ideas 
  • I need to find and create documents specifically for Design-Thinking 
  • Favorite quote: “We would like to start pushing up rather than trickling down” (Angela) 
  • I am still not convinced it was a good idea to get rid of the tech coaches and to not use design as another coach (STEAM?) 

Design-thinking at ISB is well underway, and as science, technology, and learning continue to change- so will these programs. I have no doubt it will continue to grow and evolve to create the best learning experiences for the learners it serves.

In the next blog post, I will be sharing what I found in the other innovative programs ISB offers its students in the Middle and High School levels, namely, their Future’s Academy program for grades 7 and 8, as well as the one for grades 9 and 10. Stay tuned!


Monday, April 30, 2018

Passion Projects: Design Your Own Version (Part 1)


Until recent changes in the educational systems, few of students' interests and ideas were taken into account when the curriculum was designed. As a student, were you ever asked what you wanted to learn about? Even an inquiry-based curriculum, such as the IPC (International Primary Curriculum) or the PYP (Primary Years Program), which allow for student input in the curriculum, have failed to let students be the drivers of their educational journey.

Enter "Genius Hour"...


Genius Hour is a concept originally created by Google, Inc. The idea behind Genius Hour was to let Google employees explore their passions for 20% of their workload, as long as it was perceived to benefit the company (Google). Sounds pretty simple, but the results of this experiment turned into a fantastic avenue for Google employees' creativity and ingenuity. Several of today's successful Google products, such as Gmail, Adsense, or Google News, have been the result of Google's Genius Hour efforts.

The success of this idea has been infectious- many companies started their own version of Genius Hour, and recently, the education system has seen risk-taking teachers and administrators trying to implement these ideas into their own teaching load and curriculum. Genius Hour in schools, has been given different names ("20% Time", "Passion Time", "Passion Project", and more) and looked a bit differently, but was based on the same premise, that both the students and the institution benefit from pursuing their unique passions. Students choose something they wish to learn about, embark on a research journey, and end the "project" with a presentation and/or a product.


In this three-part blog series, I share my own journey and outline some ways educators could offer their own version of a personalized learning opportunity for their students. More specifically, in this first post I provide readers with general information about how to begin their journey, and share a presentation to introduce teachers to Genius Hour- including the process, timeline, suggested frameworks, and more. In the second and third posts, I get into the nitty-gritty of each component of the Genius Hour project: finding time in the curriculum, creating a realistic timeline, grouping students, determining acceptable projects, using appropriate research and design frameworks, using a platform to host, guiding and supporting students, using mentors and experts, presenting, and finally, ending this fulfilling journey with presentations and a celebration.

Yes, there is quite a lot to think about when one wishes to embark on such a journey. I am hoping you find this blog post series as a starting point that would help you conceptualize and create whatever works for you and your students.

So… Where do I Begin?

Embarking on a "Passion Project" Journey...

Last year, I decided it was time for me to explore what such project-based learning could do for my students' education. I did a lot of research and found an incredible amount of information about how Google's Genius Hour was reincarnated in different educational settings. I found frameworks, timelines, philosophies, project examples, presentations, and more. It seemed that everything I needed was out there for me to use. But the more I dug in, the more I realized that my idea of Genius Hour was a bit different than each of the documents and experiences I've found. What I needed to do was to pick and choose, to synthesize the information I found valuable, and to come up with a unique product that would fit my needs, my school's philosophy and my students' individual personalities and learning styles.

You will need to do the same. I recommend you read on to get an idea of what you should look out for, get some ideas, and create your own version of Genius Hour.

How to Start:

Follow the numbered points below to learn about Genius Hour/ Passion Project and to slowly set up the supporting structures that will accompany your students' journeys. 
  1. Get yourself familiar with what's out there. Spend some time searching the Internet for examples of "Genius Hour", "Passion Projects", and "20-Time" at different schools and in different levels. 
  2. Get organized. Create a folder on your computer and a bookmark folder to save and store useful websites and files, so that you can refer back to them throughout your planning and teaching. 
  3. Make sure you know what you are doing and why. Create your own "Passion Project Manifesto"- Explain to yourself why you are doing it, what the benefits would be, what essential knowledge and skills your students should gain upon completing the project, etc. Another very important thing to think about is the guidelines for projects (see below). This will be helpful when you are asked to explain what you are doing and why, as well as when you evaluate the work you and your students did at the end. 
  4. Start planning. Think about where this experience can take place in your workweek. Create a tentative timeline: Break the process into clear steps, and make a list of helpers and mentors you could rely on to support student learning. 
  5. Start creating! Now it's the time to start creating content for your students. This can be a long and tenuous process, so I will be sharing with details how I decided to design my passion project experience. 

Getting Everyone on Board

Creating a personalized learning experience is not an easy task. It requires not only to find the time and plan it well, but also to convince others that instructional time is not being wasted. Once you create your manifesto and outline your plan (with as many details as possible), test the waters with colleagues whom you feel safe with. Remember, being innovative does not mean you have all the right answers- it means you are stepping out of your comfort zone to plan and create experiences students would benefit from! It will not be perfect the first time, but it is completely worth it. If you take this seriously, you will realize that on your own.

I created a sample presentation you could use to get a better understanding of what a Passion Project looks like. You can feel free to adapt it to your own needs and share it with colleagues, parents, administrators, or anyone who wishes to learn more about what it is and how it can be done.


This is the first part of a two-part blog entry about passion projects. You can find the second part here.

I hope you find this blog post useful. I would appreciate any feedback and/or suggestions right here in the comment section or through a tweet to @EduRonen. This is a learning journey, and any input is important. Thank you!


Sunday, January 7, 2018

Twitter- Beyond the Basics


OK. So you got yourself a Twitter account, found some people to follow, shared your wisdom, some users seemed interested in what you have to say and have followed you- all seem to be in place, aside from you finding yourself asking the same questions again and again... "Why is my feed so messy?", "Remind me again why I am following this guy?!", "What was that education chat called?", and so on.

In this post, I'm going to try to help you take your basic Twitter skills to the next level. And along the way, you will get some ideas as to how to advertise yourself and gain more followers. You will also be organizing your feed so that your browsing experience is cleaner and more focused.

I am assuming you have some understanding of what Twitter is and how to use it, even on a basic level. If not, you can check out this blog post ("Getting Started with Twitter") where I discuss, explain and show, if Twitter is the right tool for you, and if so, how to set up an account and personalize it, how to follow interesting accounts, and how/why/what to tweet.

Attracting More Followers

Now that you set up your account, shared and exchanged your views with other Twitterers, it's time to think about how to broaden your audience. The magic recipe behind attracting more followers is actually pretty simple- the more you share, the more people value your ideas, and the more followers you gain. But there's a catch here- simply sharing ideas in the wide Twitterverse is not enough- you need a strategy. Here are some ways you could successfully develop your presence:


  • Share, Share, Share- Again, on the most basic level, the more you share the better, especially if it has to do with a particular topic. This being said, focus on both quality and quantity. Other users will start recognizing your name, will reply to your ideas and opinions, and would hopefully like what you have to say. So get yourself as involved as you can in different Twitter chats (for example, educators can join "EdChat", "AsiaEd", "EdTechChat", etc.). Learn when they start, what the topics to be discussed are, and share and respond to others while the chat takes place.
  • Create, Create, Create- The more you create, the more valuable you become to a profession or to a group. If you have a blog, make sure you share your posts on Twitter. If you have an interesting slideshow, a successful presentation or lesson you taught, etc.- share them with the world! For all of the above, whenever you share, make sure you use the right hashtags so that the right people find it in their searches. Also, remember that valuable ideas can be re-introduced, so feel free to re-share valuable information every once in a while.
  • Follow the Right People- Another strategy to attain more followers is to follow more people. Since many users see following others as a "favor" that should be returned, they also do the same when someone follows them (even if it means they mute that person's tweets). You can find users with similar interests through browsing particular hashtags, or even through browsing through a user's group of followers or the account that person follows.

Organizing Your Feed

So now you have a bunch of followers, and you are following some great thinkers and sharers. Once you consider yourself "an active Twitterer" it's important to make sure you see the right kind of information when you log into your account. The main problem is that sometimes, for whatever reason, the people you follow post content that is irrelevant to your needs. To address this issue you have some possible solutions:

1. Cleaning House

Your first choice is to unfollow accounts. Maybe you chose to follow someone who has been very active in one topic, but stopped sharing this kind of information. Should you still follow them? If you choose to unfollow them, which is an extremely simple procedure (see GIF below), remember that many users see following each other as a reciprocal act- "I follow you and you follow me", so if you choose this route, be aware that they may unfollow you back, which may cause you to lose quite a lot of followers.


Following and Unfollowing Accounts

2. Muting Accounts

To avoid losing followers, you can choose to mute accounts. "Muting" accounts means that these users' tweets and retweets don't show up in your feed. If they send you a direct message or mention your name, those will still show. Here's how to mute accounts:


3. Using Lists

Together with the above two organizational strategies, creating individual lists by topic, place, etc. is another way to organize your feed. Depending on your individual needs and the number of people you follow, the more lists you may need to have. A list means that you "tag" users according to a topic of your choice. For example, I have several lists- one for those who post about Educational Technology, another one for educators in Africa, one more for Educational Leaders, etc. Then, when I want to focus my browsing on EdTech, I go to the Educational Technology list, and only information from those accounts appear, filtering the content to my needs.

Notes about lists:
  • You can add as many users as you wish to any list
  • You can add users to more than one list
  • You don't have to follow users to add them to a list
  • You can create private lists (they appear only to you)
  • You can create public lists (so other users can see/use; they get a simple notification)
  • You can copy (called "Subscribe to") other users' lists (you won't be able to add anyone new though)

So how do you create lists?

Twitter's native option is to add each user manually, like this:


This is a convenient way to add users to lists if you do it as soon as you find them, but if you are a bit down the road and have too many lists and users to add, you may want to use third-party services, like TwitListManager. This is a simple and straightforward free service that integrates into Twitter. You go to the website, allow access to your account, and the next time you choose to add or remove users to/from a list, you get a window with a vertical list of those you follow, and a horizontal list of your lists (see image below). You can also reach this window by going here directly.
    • Main Advantage: Easy to add and remove users, and to create new lists.
    • Main Disadvantage: Interface is too simple. When you scroll down (users are displayed in groups of 100), you can't see the name of your lists.
    TwitListManager
Visit the resource links below for more Twitter list organizing services.

Subscribing to Other Users' Lists

Unless your list is going to be unique, there's no reason to invent the wheel. You can sometimes find excellent lists created by other users, and simply subscribe to them. As their list grows, so does yours. Check out the GIF below to learn how to subscribe and unsubscribe from other users' lists.
*** Note that you are subscribing to someone else's link, which means it does not belong to you so you can't choose to add or change the list in any way.


Getting Access to Lists and Hashtags Even Faster

Lists are a great way to filter content, which together with Twitter's Search option (for particular hashtags or users), would do the job. An excellent way to get to all this information ever quicker is to bookmark your lists or popular hashtags, and placing them in one "Twitter" folder in your bookmarks bar.

More resources


  • Attracting More Followers
    • Forbes (article)- "50 Free Ways To Increase Your Twitter Followers"
    • Search Engine Journal (article)- "22 Tips to Gain More Followers on Twitter"
  • Popular Chats in Different Areas/ Topics
    • Participate (for educators)- A great live list of education-related chats that are happening every week as well as chat links to particular topics within the education field.
    • Huffington Post (for entrepreneurs)- "10 Twitter Chats for Entrepreneurs"
    • The Global Grid (for architects)- "10 Twitter #Chats to Follow in Architecture"

  • Getting More Out of Twitter using 3rd-Party Services:
    • Lilach Bullock (article)- "101 Top Twitter Tools of 2017" 
    • Brand Watch (article)- "The Top 12 Free Twitter Analytics Tools"

Conclusion

There different strategies to make sure you gain more followers, follow the right people, and to organize your feed. Being an active Twitterer who shares not only views but also experiences that others can learn from and apply, is an excellent way to connect with more like-minded users. Creating and managing lists, and bookmarking them are excellent strategies to ensure you find the content you need faster.

If you have questions, additional information, or suggestions for future Twitter-related posts, please feel free to share them in the comment section below or on Twitter, using @EduRonen handle.

Monday, November 13, 2017

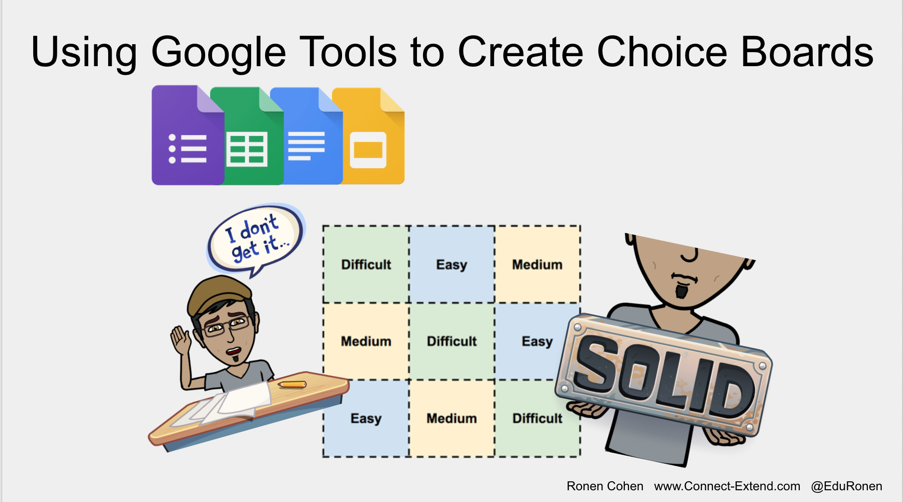
Use Google Tools to Quickly Create Awesome Choice Boards


John Hattie explains that in order to properly differentiate, "The teacher will have to provide different ways in which students can demonstrate mastery and understanding along the way to meeting the criteria for success.”

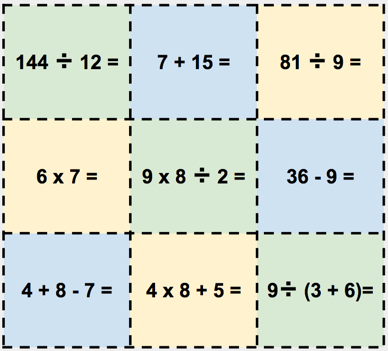
Using Choice Boards in the classroom is a great way to engage students while honoring their differences. Choice Boards can help teachers with the never-ending task of differentiating classrooms, allowing students to actively participate in the learning process, allowing them choice across the curriculum- in the content, the process, and the product, which in turn have a great effect on the classroom environment.

This being said, it is extremely important to remember the words of Carol Tomlinson (2016):

'Differentiation is not a set of strategies, but rather a way of thinking about teaching & learning.'
With this in mind, let's have a look at what Choice Boards are and how they can be used in diverse classrooms:

What are "Choice Boards"?

  • They are graphic organizers
  • They include a series of activities that focus on students’ specific learning needs, interests, and abilities.
  • Students decide which activity they are most comfortable completing first, and once they master it, they can move on to more challenging activities.

How to Create Choice Boards?

  1. Identify one instructional focus for your Choice Board
  2. Use data to determine students’ interests, readiness, and learning styles
  3. Design 9 tasks. Differentiate them based on the information you determined above.
  4. Use the templates on the upcoming slides to arrange the tasks.
  5. Students choose 3 tasks to work on- These tasks must be ordered horizontally (row), vertically (column) or diagonally.
When designing these boards, it is important to ensure that the tasks students choose are diverse, so that each can enhance each other and capitalize on a variety of student strengths. In order to do so, here are several ways you could structure your boards:

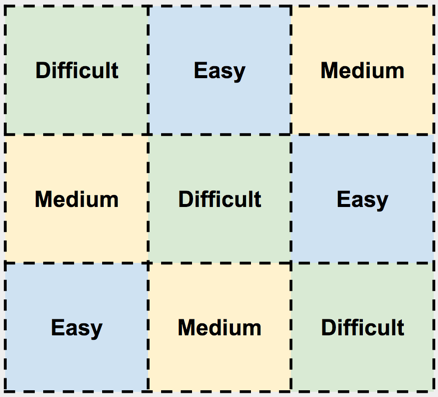
Task Arrangement: By Level of Difficulty:

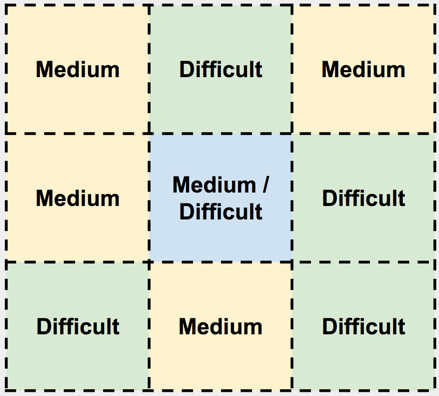
The main idea behind this arrangement is that no matter which three tasks students choose, they will be working on at least one higher level tasks, whereas students who wish to take on more challenges, can choose all three tasks in the Difficult level.


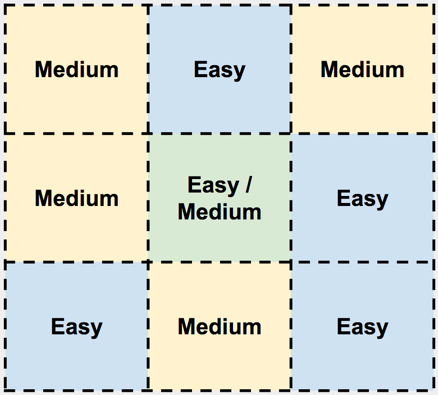
A variation of the above difficulty level arrangement is to further classify tasks according to level, and providing students with only two difficulty levels to choose from:

       Easy & Medium:
 

       Medium & Difficult:

Task Arrangement: By Level of Questioning Skills:

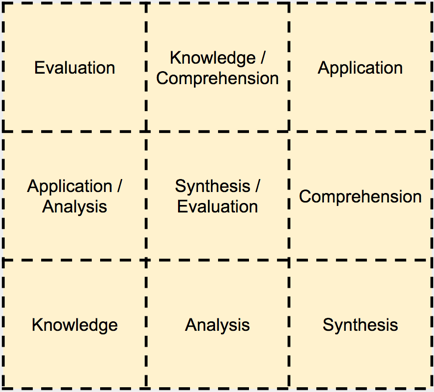
Another way by which you could create tasks is by questioning skills (Bloom's Taxonomy). This arrangement, once again, forces students to choose tasks in a variety of levels:


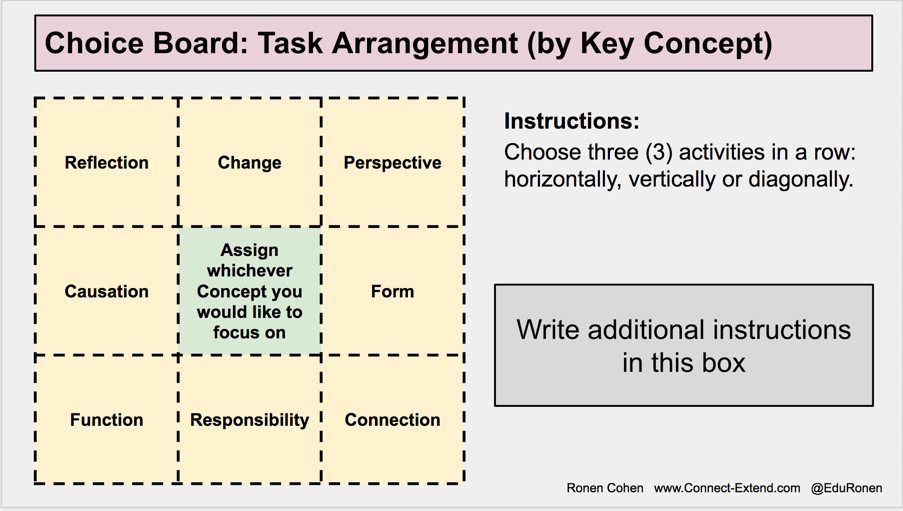
Task Arrangement: By Key Concepts

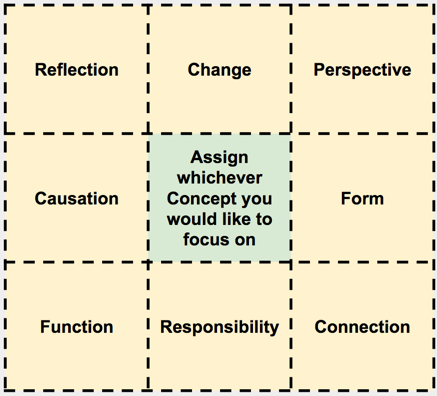
For those of you who work under the PYP/ IB framework, creating tasks that correspond to Key Concepts is an excellent way to ensure students examine issues from different perspectives:


The nature of these Choice Boards allows teachers the flexibility we need to create Choice Boards tailored to both our and our students' needs. Feel free to use the above arrangement ideas when you create your own boards.


Using Google Tools to Quickly Create Choice Boards

In this blog post, I explore 3 different tools teachers can quickly create Choice Boards: Google Docs, Google Slides, and Google Forms. Each method has its advantages, but they all end up with the same product: a simple way to create Choice Boards!

1. Using Google Docs to Create Choice Boards Templates

This method is the easiest of the three. You create a template and re-use it whenever you, or anyone else, needs.

In order to create templates in Google Docs, you need to be a part of GSuite (for organizations, schools, etc.). Here is how it's done:
  1. Open Google Docs
  2. Create your Choice Board template
  3. Go to Docs.Google.com (of your G-Suite organization) and click on “Template Gallery”, then “Submit Template”
  4. Select the document you chose, and voila!
Now, pending the approval of your organization's GSuite administrator, anyone in your organization can locate and use your template!

*** If you are a single Google/Gmail user (not a part of the GSuite), unfortunately, you can’t create a template. Instead, you’ll need to make a copy of your document.

Here is a short explanation of how to create a Google Doc template (for GSuite users):


How to create templates for your organization

 This short video shows how to make a copy of a document (for regular Google Apps users):


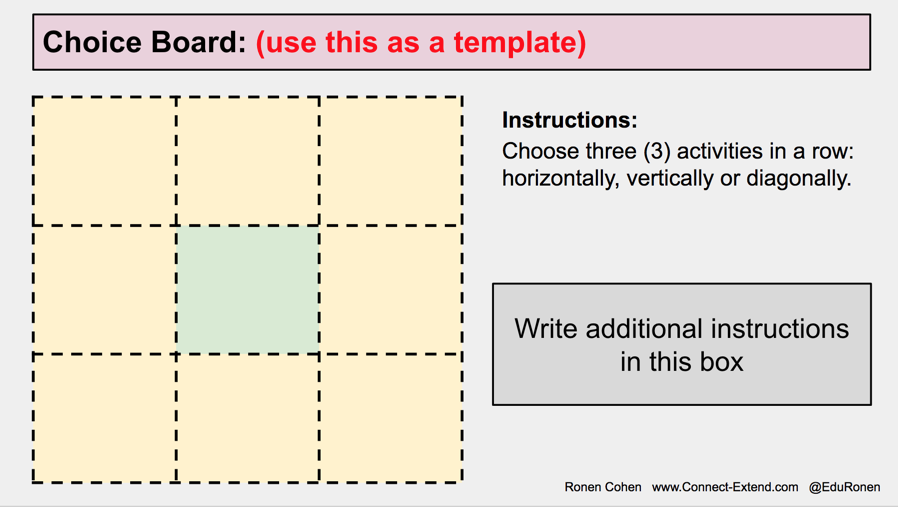
Here is the template you saw in the screencasts. Feel free to copy and use it.

2. Using Google Slides to Create Choice Boards Templates


Another simple way to create Choice Boards is to create a Master Template in Google Slides, and to use and re-use it to create new boards (see images above). Once your Choice Board slide is ready, you can print it out, share it with your students through Google Classroom, etc.

Use this link to make a copy of the Google Slideshow below:


3. Using Google Forms to Create Choice Boards Templates

OK. This is the coolest part. Are you ready?
While working on some Tic-Tac-Toe boards for my students, I realized that the omnipotent Google Forms can come to my help once again. How? Using the add-on Form Publisher, I will create a Google Form with generic questions, and link it to a Google Doc template. Yes, it's that easy!

Use the Google Form and Google Doc template I created (below), and adjust it for your needs. You're welcome!

If you're not sure how to do it, follow the steps below to learn how it all works!

Before we start, here is the link to the Form and the Template. If you would like more information about what Choice Boards are and how to create different Tic-Tac-Toe menus, go through the Google Slides above. And yes, you can feel free to make a copy and use the Slides for your own purposes.

So... How does it all work? Simple:
  1. Make a copy of the Google Form I created.
  2. Make a copy of the Google Doc template I created.
  3. Create a new folder on your Google Drive and place both files in that folder. This organization pays later!
  4. Download the Forms add-on "Form Publisher"
  5. Open Form Publisher and link the Form to the template.
  6. Fill in the form
  7. Check your e-mail for your new awesome Choice Board
  8. Open the Google Doc and adjust its look (colors, fonts, information, etc.)
If you need a video tutorial, here it is:

How to use Form Publisher to create your Choice Board template

I hope you find these methods helpful. If you have any other cool ways to create templates for differentiation, please write them in the comments below.

If you would like to use this information as a presentation, here is a link to a Google Slides.

Feel free to reach out on Twitter @EduRonen!


Saturday, October 21, 2017

14 Chrome Extensions to Support Students with Learning Challenges

Blog- Learning Challenge Chrome Extenstions.jpg

What is “Assistive Technology”?

I vividly remember being back in Elementary school, sitting at my desk during a writing assignment, and complaining that my hand was too tired of writing so much. I also remember that two of my classmates had serious learning challenges. One was mostly deaf and the other had a physical deformity, which caused her serious fine and gross motor problems. Both of them had few opportunities to gain meaningful access to the curriculum, let alone an “equal” access. That was in the mid-1980s. almost 30 years have passed, and the picture has dramatically changed. The development of computer-based technologies has allowed people with disabilities to gain access to more information, to manipulate objects and tools, and to express themselves in ways other people can understand, relate to, and appreciate. Such technology is called “Assistive Technology”.
The term “Assistive Technologies” is defined by the American Assistive Technology Act of 1998 as, “Any item, piece of equipment, or product system, whether acquired commercially off the shelf, modified, or customized, that is used to increase, maintain, or improve functional capabilities of individuals with disabilities.”
There are many types and degrees of “disabilities”, and designers of Assistive Technology have been creating more and more tools as solutions for the myriad of ways individuals struggle. The PBS Parents website separates these devices into 8 categories: Access and Environmental Control, Aids to Daily Living, Assistive Listening, Augmentative/ Alternative Communication, Computer-Based Instruction, Mobility, Positioning, and Visual Aids.
A variety of software and hardware companies, such as Microsoft, Google, and Apple, as well as many smaller ones, have recognized the need to develop such tools, and have pledged a commitment to ensure easier access for their users. The Accessibility sections of their websites are easily accessible, organized, and simple to navigate. In addition, they ensure that many of the accessibility functions come built-in and easily accessible, so users are able to make use of such features without the need to purchase additional software.

Your Device’s Accessibility Features

Before you and your students look at hardware, software or add-ons to purchase and install, you must first get yourselves familiar with your device’s native, built-in features. The links below include links to resources for different devices and platforms. They include excellent tools to support users with a variety of challenges, so spend time on these websites before going on.
2017-10-21_09-30-44 (1)

Accessibility Tools: Google Chrome Extensions

Google’s commitment to supporting users with a variety of different needs is illustrated by the numerous accessibility features their devices offer. In addition, Google’s Chrome Store has additional third-party extensions that make devices and the Internet more friendly and accessible to their users.
Below I outline 14 excellent Chrome Extensions that make computer use an easier and a more pleasant experience- not only for those with severe challenges, but also for anyone who needs simple modifications and some assistance when working on their devices.

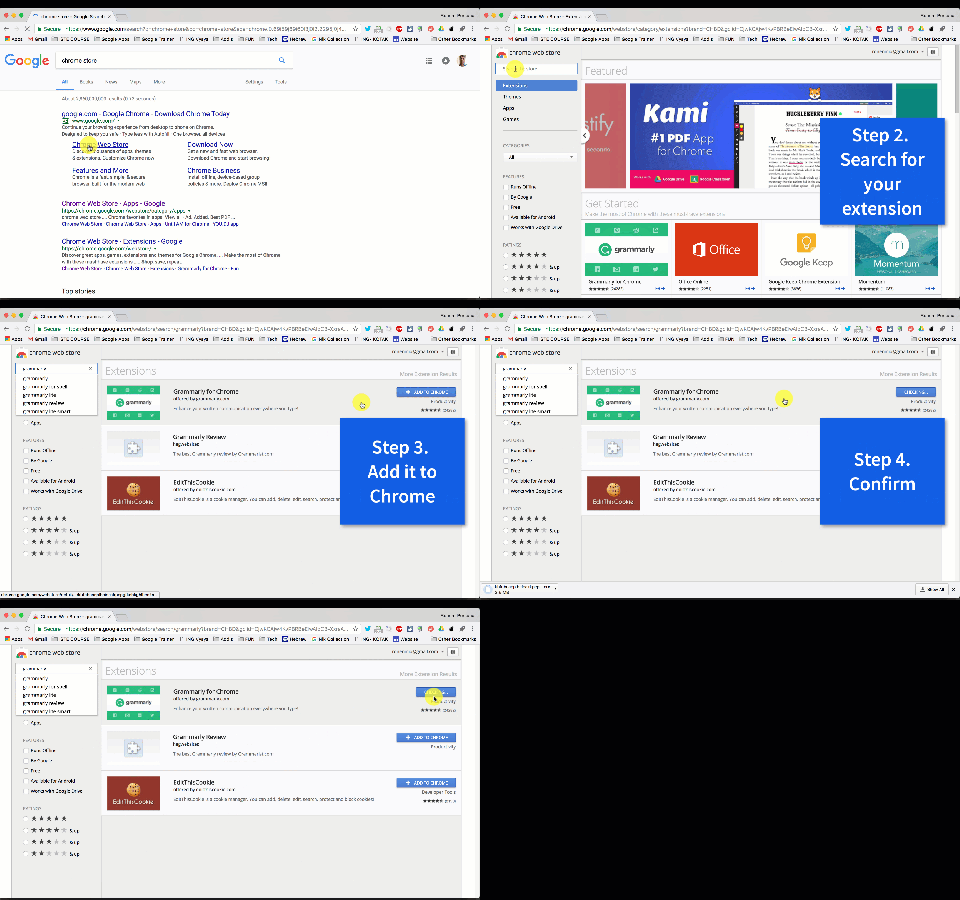
How to add a Chrome ExtensionGIF- Chrome Extension


14 Chrome Extensions for different learning needs

human-eye-clip-art-1384151134  Visual Difficulties

Vision is an extremely helpful Chrome extension that lets users choose a particular color scheme they feel comfortable with, and then adjusts every Chrome page’s colors to fit that scheme.
***Note: This extension changes the settings on your device. If you choose to delete it, first make sure you reset the colors to their original scheme.
NoSquint Plus allows users to set and remember site-specific color schemes and zoom levels so that they can read in a more convenient and personalized way. You can easily set zoom levels, background and foreground colors.
YouTube Colors Filters is a simple Chrome extension that lets you adjust many different visual aspects (brightness, contrast, saturation, and more) in every YouTube video you watch.
Screen Shader – F.lux for Chrome is a popular Chrome extension (works offline as well!) that allows users to change the color of their screen to match the time of day. It also gets rid of the screen’s automatic white and blue light that can cause eye irritation.
Select and Speak is a text-to-speech Extension. All users need to do is highlight the text they would like to be read aloud, and they’re done. This extension has a more natural human voice (male or female), and users can choose voice and speed options as well as select from several different languages.
OpenDyslexic is an excellent extension designed for dyslexic users. It changes all font on the page into a more easily readable font.
Snap&Read Universal is another text-to-speech extension, but with an added twist. Highlight text you want to be read to you (including text within images, which other tools have difficulty reading), and it will both read it to you AND highlight each word as it is read. Brilliant!

ear-svg_0  Hearing Difficulties

Substital is a Chrome Extension that automatically adds subtitles and closed captions to online videos on a variety of video content providers (YouTube, Netflix, Amazon Prime Video, and more). It allows users to synchronize the captions with the audio and adjust font size (and other features). You can also add your own subtitle files or search for existing ones in-app. Works with some success, but better than other similar services.

  Physical Difficulties

For fine motor (finger manipulation) difficulties, the device’s native speech-to-text features can be of great assistance. Here are two Chrome extensions that can help with fine motor obstacles:
Dictanote is a note-taking extension. You can quickly switch between using your fingers and your voice to type. It has a built-in word processor, and you can download your notes. The paid version allows you to organize your notes into notebooks and save them in the cloud.
Vimium can help users who have difficulties operating the computer’s mouse. The use of the mouse is replaced by a variety of keyboard shortcuts.

target-icon   Attention/Focusing Difficulties

Simple Blocker can keep users more focused for longer periods of time. You can quickly block an unlimited number of entire websites, sub-domains, or particular web pages. You can also set a blocking timer to reward yourself after a focused period of time. Password protected.
Boom- Declutter Pages, Improve Readability allows you to select anything you see on your page and make it disappear in one simple click. Quite amazing, actually! It also allows you to read content without signing into websites (like Pinterest), delete advertisements, and more! (a personal favorite!)
Rocket Readability is a simple extension that gets rid of unnecessary clutter- an entire web page turns into a text-only page with only the article to read. No images, no videos, just words.
Mercury Reader is another extension that makes it easier for users to have a less distracting working environment. Its features include ways to remove ads, comments, and noises; adjust typeface and text size, and change between dark and light themes.


I hope you find these Chrome Extensions useful and helpful. If you have any questions or know about other favorite and helpful Extensions, please share them in the comment section below.